


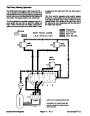
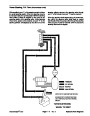
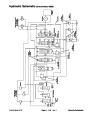


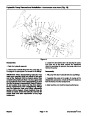
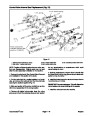
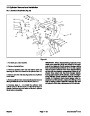
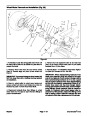


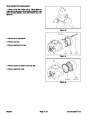
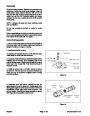


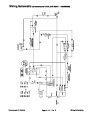

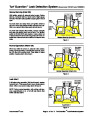
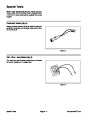


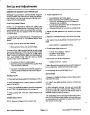
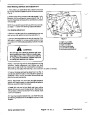


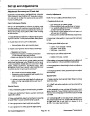
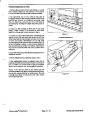
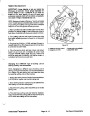

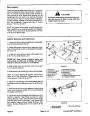


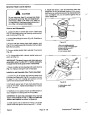
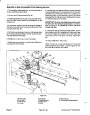

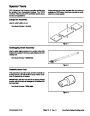


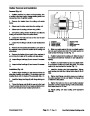

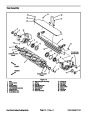
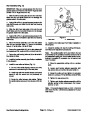


Control Valve No. 1 Spool Detent Replacement (Fig. 28, 29)
NOTE: These procedures can be done with the control
valve assembly installed on the machine.
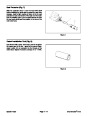
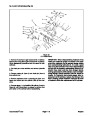
1. Remove the entire detent assembly from the control
valve. Keep the backup washer, seal retainer and seal
with the spool.
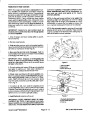
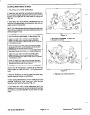
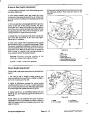
2. Apply Locktite 222 or equivalent to threads of detent
stud (Item 9) and assemble into spring and stop collars
(Items 6 and 8). Thread the assembly into the No. 1
spool. The spring (Item 6) needs to be compressed to
get detent stud started. Anchor the slotted end of the
spool and apply 10-14 ft-lb (13.6-19 Nm) torque to
detent stud (Item 9).
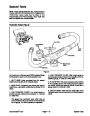
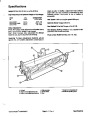
Figure 28
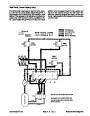
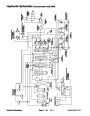
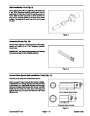
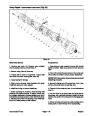
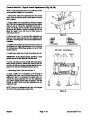
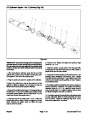
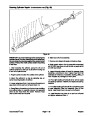
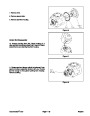
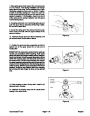
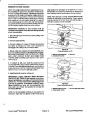
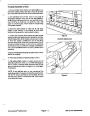
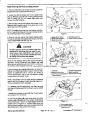
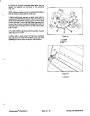
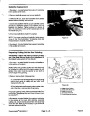
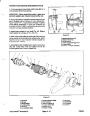
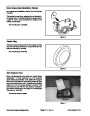
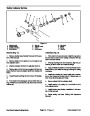
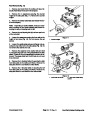
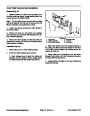
3.
Slip bonnet (Item 1) over the entire assembly and
secure it to the valve body with the two capscrews. Be
sure slot in mounting face of bonnet is at bottom before
installation.
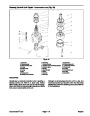
1. Bonnet
2. Spring
3. Race
4. Ball
5. Thrust plate
6. Spring
7. Capscrew
8. Stop collars
9. Detent stud
10. Adjustment cap
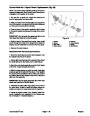
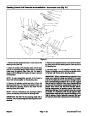
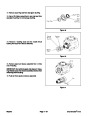
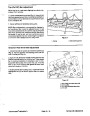
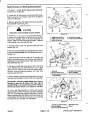
4. Install the thrust plate (Item 5) into the bonnet (Item 1)
so it bottoms out. Apply approximately 1/4 in. (6 mm) of
#2
multi-purpose Lithium-base grease on top of thick
washer (Item 5).
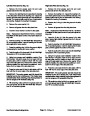
5. Install twelve balls (Item 4) into thrust plate (Item 5).
IMPORTANT: If the detent bonnet contains a vent
pocket, do not let the balls fall into the vent.
6. Insert race (Item 3) on top of balls with ramp of race
facing inward as shown. Rotate race (Item 3) until you
are sure all balls are resting properly against the sur-
faces of the race and thrust plate (Items 3 and 5).
7. Insert spring (Item 2) into bonnet (Item 1).
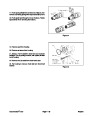
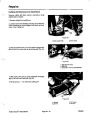
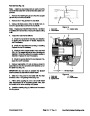
8.
Apply Locktite 222 or equivalent to the threads of
adjustment cap (Item 10) and thread into bonnet. Turn
adjustment cap in to compress the spring (Item 2).
Actuate the spool assembly, then turn the adjustment
cap until the desired detent action is obtained. This will
usually be within three turns from bottoming out the
adjustment cap..
NOTE: Each turn of adjustment cap (Item 10) changes
the “Feel” of the detent action about 20%.
Figure 29
Repairs
Page 4 - 48
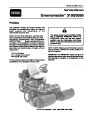
Greensmaster® 3100
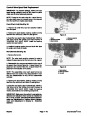
| Categories | Lawn Mower Manual, Sprinkler and Irrigation Manuals, Toro Sprinkler and Irrigation Manuals |
|---|---|
| Tags | Toro Groundsmaster 3050, Toro Groundsmaster 3100 |
| Download File |
|
| Document Type | Catalog |
| Language | English |
| Product Brand | Toro. Customer Service Representatives are available by phone:
Monday - Friday 7:30 a.m. to 9:00 p.m. (CDT) - Saturday 8:00 a.m. to 8:00 p.m. (CDT) - Sunday 10:00 a.m. to 8:00 p.m. (CDT)
Canada 1-888-225-4886 USA 1-888-384-9939, Lawn Mower |
| Document File Type | |
| Publisher | toro.com |
| Wikipedia's Page | Toro Company |
| Copyright | Attribution Non-commercial |
(0 votes, average: 0 out of 5)