


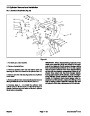


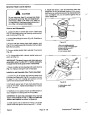


Control Valve Spool Seal Replacement
IMPORTANT: To prevent leakage, make sure you
keep foreign material such as dirt, sand or paint
chips out of valve body seal grooves.
NOTE: Except for the seal under No. 4 spool bonnet,
the valve bank does not normally have to be removed
from the machine to replace spool seals.
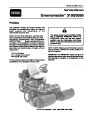
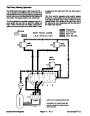
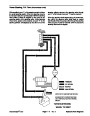
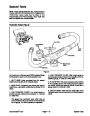
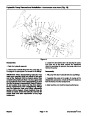
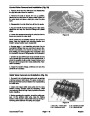
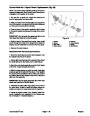
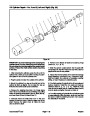
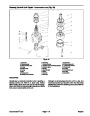
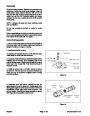
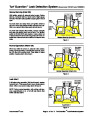
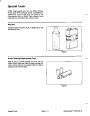
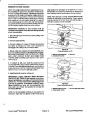
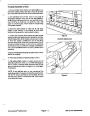
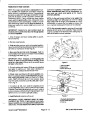
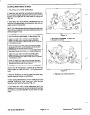
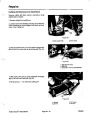
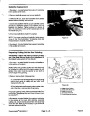
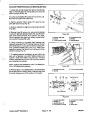
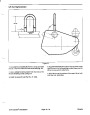
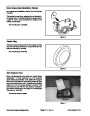
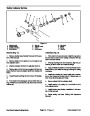
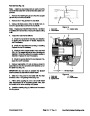
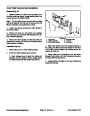
Front (Chain Link) Side (Fig. 25)
1.
Remove the chain link, boot and breather washer
from the spool.
2.
Remove the seal retainer, back-up washer and lip
seal from the valve body. Clean the seal groove.
Figure 25
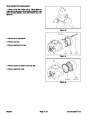
3. Soak the new seal in clean hydraulic fluid. INSTALL
THE SEAL WITH THE OPEN (LIP) SIDE FACING IN
TOWARDS THE VALVE BODY. Install the back-up
washer and seal retainer
1. Boot
2. Breather washer
3. Seal retainer
4. Back-up washer
5. Lip seal
4. Install the breather washer, boot and chain link. Start
the engine and check for leaks.
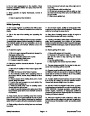
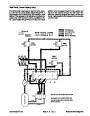
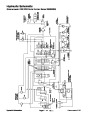
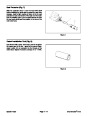
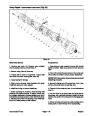
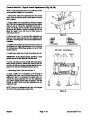
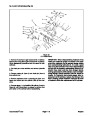
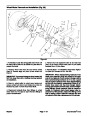
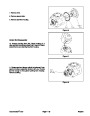
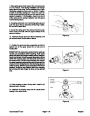
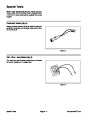
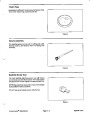
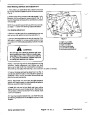
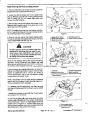
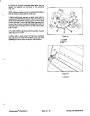
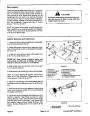
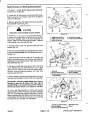
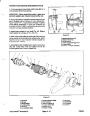
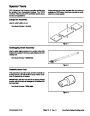
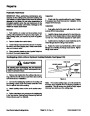
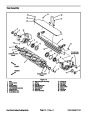
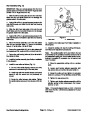
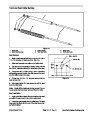
Rear (Bonnet) Side (Fig. 26)
1. Remove the bonnet.
NOTE: The valve bank must be removed in order to
replace the spool seal under the bonnet on No. 4 spool.
2. Disassemble the components attached to the rear of
the spool. (See Control Valve No. 1 Spool Detent Re-
placement and Control Valve No. 4 Spool Detent Re-
placement in this section of the book.)
Figure 26
1. Seal retainer
2. Back-up washer
3. Lip seal
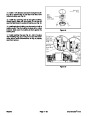
NOTE: The assemblies under each spool bonnet are
different from one another. Pay close attention to how
they are disassembled so they will be reassembled
correctly.
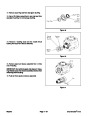
3.
Remove the seal retainer, back-up washer, and lip
seal from the valve body and clean the seal groove.
4. Soak the new seal in clean hydraulic fluid. INSTALL
THE SEAL WITH THE OPEN (LIP) SIDE FACING IN
TOWARDS THE VALVE BODY. Install the back-up
washer, seal retainer and remaining components.
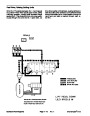
IMPORTANT: Make sure the switch is correctly po-
sitioned and adjusted when bonnet is installed on
No. 2 or No. 4 spool. (See Mow/Lift Switch Replace-
ment and Adjustment or Traction Switch Replace-
ment and Adjustment in Chapter 6 - Electrical
System.)
Repairs
Page 4 - 46
Greensmaster® 3100
| Categories | Lawn Mower Manual, Sprinkler and Irrigation Manuals, Toro Sprinkler and Irrigation Manuals |
|---|---|
| Tags | Toro Groundsmaster 3050, Toro Groundsmaster 3100 |
| Download File |
|
| Document Type | Catalog |
| Language | English |
| Product Brand | Toro. Customer Service Representatives are available by phone:
Monday - Friday 7:30 a.m. to 9:00 p.m. (CDT) - Saturday 8:00 a.m. to 8:00 p.m. (CDT) - Sunday 10:00 a.m. to 8:00 p.m. (CDT)
Canada 1-888-225-4886 USA 1-888-384-9939, Lawn Mower |
| Document File Type | |
| Publisher | toro.com |
| Wikipedia's Page | Toro Company |
| Copyright | Attribution Non-commercial |
(0 votes, average: 0 out of 5)