

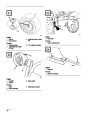


6.
7.
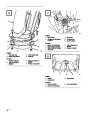
Support the auger blades so that the auger is 1/8
1/4 inch off the ground.
-
Move the scraper so that it contacts the flat
surface all the way across, then tighten the two
rear flanged cap screws securing scraper and
skids to the side plates. This temporarily locks
the scraper in the proper position so that the
remainder of the fasteners can be tightened
without affecting adjustment.
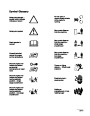
POTENTIAL HAZARD
•
Rotating impeller or auger can cause
injury.
WHAT CAN HAPPEN
•
Rotating impeller or auger can cut off or
injure fingers or hands.
HOW TO AVOID THE HAZARD
•
•
•
Stay behind the handles and away from
discharge opening while operating the
snowthrower.
8.
9.
Secure the scraper using carriage bolts and nylon
locknuts.
Adjust the skids; refer to Adjusting Skids,
page 17.
Keep face, hands, feet and any other part of
your body or clothing away from
concealed, moving or rotating parts.
Before adjusting, cleaning, repairing and
inspecting the snowthrower, and before
unclogging the discharge chute, shut engine
off and wait for all moving parts to stop.
Also, pull wire off spark plug and keep
wire away from the plug to prevent
accidental starting.
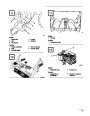
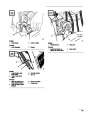
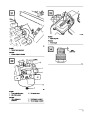
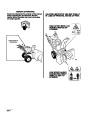
Adjusting Skids (Fig. 9)
For Concrete or Asphalt Surfaces
•
•
If the snowthrower is not cleaning up the snow close
enough to the pavement, adjust the skids to lower the
scraper.
Use a stick, not your hands, to remove
obstructions from discharge chute.
If the scraper catches on cracks in the pavement,
adjust the skids to raise the scraper.
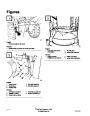
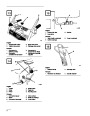
Adjusting Scraper (Fig. 8)
1.
2.
3.
Pull wire off spark plug and make sure wire does
not contact plug accidentally.
Adjust the scraper to compensate for wear and to
ensure that the auger does not contact the pavement.
Loosen the (4) flange bolts securing both skids
to the auger side plates.
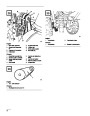
1.
Pull wire off spark plug and make sure wire does
not contact plug accidentally.
Check scraper adjustment to ensure that the
auger does not contact the pavement; refer to
Adjusting Scraper, page 17.
2.
Check the tire pressure in both tires. Make sure
that they are both inflated equally between 7 and
15
psi.
4.
5.
Move the wheels to the REAR Power Shift
position.
3.
4.
5.
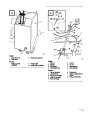
Move the snowthrower onto a flat surface and
shift the wheels to the FRONT position.
Support the scraper to be 1/8 inch above a level
surface if the snowthrower is to be used on
smooth pavement.
Loosen the (4) flange bolts securing both skids
to the auger side plates.
Note:
The scraper should be higher than 3/16
inch above the pavement if the
pavement surfaces are cracked, rough
or uneven.
Next, loosen the carriage bolts securing the
scraper to the auger/impeller housing.
GB–17
| Categories | Snow Blower Manuals, Toro Snow Blower |
|---|---|
| Tags | Toro 1028 Power Shift, Toro 38558, Toro 38559 |
| Model Number | 38559 |
| Model Year | 1999 |
| Download File |
|
| Document Type | Operator's Manual |
| Language | Français |
| Serial Number | 99000001 - 99999999 |
| Product Name | Toro 1028 Power Shift Snowthrower |
| Product Brand | Toro. Customer Service Representatives are available by phone:
Monday - Friday 7:30 a.m. to 9:00 p.m. (CDT) - Saturday 8:00 a.m. to 8:00 p.m. (CDT) - Sunday 10:00 a.m. to 8:00 p.m. (CDT)
Canada 1-888-225-4886 USA 1-888-384-9939, Snow Blower |
| Product Type | Snowthrower |
| Product Series | Snowthrower, Two Stage Power Shift |
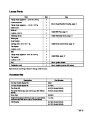
| Swath | 21 inch |
| Discharge | Two Stage |
| Engine Manufacturer | Tecumseh |
| Engine Oil Type | 26 oz. (.8l) 5w-30 or 10w / API SH or higher |
| Gearbox Lubricant | 4.5 oz. (133ml) SAE 90 GL5 or higher |
| Engine Motor Model # | OHSK100-221607A |
| Engine Motor Size | 10 hp |
| Engine Motor Type | 4 Cycle CARB1, EPA1 |
| Transmission Speed | 4 Forward/2 Reverse |
| Transmission Type | Gear |
| Document File Type | |
| Publisher | toro.com |
| Wikipedia's Page | Toro Company |
| Copyright | Attribution Non-commercial |
(0 votes, average: 0 out of 5)