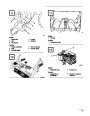

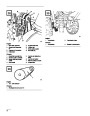


3.
Loosen hose clamps securing fuel line to valve
and slide line off valve (Fig. 15).
4.
5.
Check level of oil in gear box. Oil must be at
point of overflowing in filler opening.
4.
5.
Open valve allowing fuel to flow into drain pan.
Reinstall fuel line and secure with hose clamp.
If level of oil is low, add GL-5 or GL-6 SAE
85-95
EP transmission oil to the gear box until
point of overflow.
6.
Reinstall pipe plug in gear box.
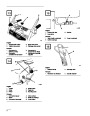
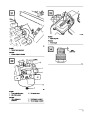
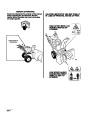
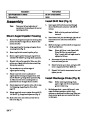
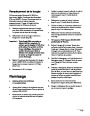
Lubricating Snowthrower
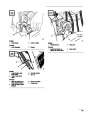
Adjusting Auger/Impeller Drive
Belt
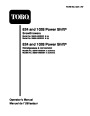
1.
Annually lubricate drive chain with chain
lubricant (Fig. 23). Wipe up any excess oil.
If auger/impeller belt slips, resulting in decreased
snowthrowing performance, an adjustment is
required. WHENEVER A NEW BELT IS
INSTALLED, AN ADJUSTMENT IS
REQUIRED. USE ONLY GENUINE TORO
REPLACEMENT PARTS.
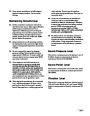
Changing Crankcase Oil
Initially, change oil after the first 2 hours of engine
operation; thereafter, change oil after every 25 hours
of engine operation or annually. If possible, run
engine just before changing oil because warm oil
flows better and carries more contaminants than cold
oil.
1.
Pull wire off spark plug and make sure wire does
not contact plug accidentally.
1.
Pull wire off spark plug and make sure wire does
not contact plug accidentally.
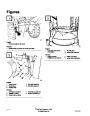
2.
Remove (3) flange head capscrews securing belt
cover to engine frame and slide belt cover up
cables (Fig. 4).
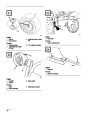
2.
Clean area around oil drain cap. Next, slide oil
drain pan below drain extension; then remove oil
drain cap (Fig. 24).
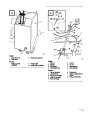
3.
Depress the auger/impeller control lever on the
right hand grip. Hold the lever and insert a .010”
(.25
center of the spring (Fig. 25). Adjust the cable to
achieve .010” (.25 mm) gap between the coils.
mm) feeler gauge between a coil in the
3.
4.
After all oil is drained, reinstall oil drain cap
securely.
Position snowthrower on a level surface. Next,
fill crankcase with oil: see Fill Crankcase With
Oil, page 13. Wipe up any oil that may have
spilled.
4.
5.
Loosen upper jam nut securing auger/impeller
cable to mounting bracket (Fig. 26).
Rotate bottom jam nut upward to increase belt
tension.
Auger Gear Box Oil
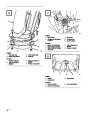
6.
7.
8.
Tighten upper jam nut against bracket.
Recheck idler adjustment: refer to step 3.
The auger gear box oil level must be checked at
setup, after every 10 hours of use, and upon removal
from annual storage. To check the auger gear box oil
level:
Check impeller brake arm clearance by releasing
the auger/impeller lever. With the lever released,
there should be more than 1/8” clearance
between tab on impeller idler arm and brake arm
(Fig. 27). If there is less than 1/8” clearance,
belt must be replaced.
1.
2.
3.
Position snowthrower on a level surface.
Clean area around pipe plug so dirt is removed.
Remove pipe plug from gear box (Fig. 11).
GB–19
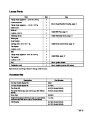
| Categories | Snow Blower Manuals, Toro Snow Blower |
|---|---|
| Tags | Toro 1028 Power Shift, Toro 38558, Toro 38559 |
| Model Number | 38559 |
| Model Year | 1999 |
| Download File |
|
| Document Type | Operator's Manual |
| Language | Français |
| Serial Number | 99000001 - 99999999 |
| Product Name | Toro 1028 Power Shift Snowthrower |
| Product Brand | Toro. Customer Service Representatives are available by phone:
Monday - Friday 7:30 a.m. to 9:00 p.m. (CDT) - Saturday 8:00 a.m. to 8:00 p.m. (CDT) - Sunday 10:00 a.m. to 8:00 p.m. (CDT)
Canada 1-888-225-4886 USA 1-888-384-9939, Snow Blower |
| Product Type | Snowthrower |
| Product Series | Snowthrower, Two Stage Power Shift |
| Swath | 21 inch |
| Discharge | Two Stage |
| Engine Manufacturer | Tecumseh |
| Engine Oil Type | 26 oz. (.8l) 5w-30 or 10w / API SH or higher |
| Gearbox Lubricant | 4.5 oz. (133ml) SAE 90 GL5 or higher |
| Engine Motor Model # | OHSK100-221607A |
| Engine Motor Size | 10 hp |
| Engine Motor Type | 4 Cycle CARB1, EPA1 |
| Transmission Speed | 4 Forward/2 Reverse |
| Transmission Type | Gear |
| Document File Type | |
| Publisher | toro.com |
| Wikipedia's Page | Toro Company |
| Copyright | Attribution Non-commercial |
(0 votes, average: 0 out of 5)