


STORAGE
OFF SEASON STORAGE
LUBRICATE HEX SHAFT AND CHAINS
WARNING: Never store the engine, with fuel in the tank,
indoors or in a poor ventilated enclosure where fuel
fumes could reach an open flame, spark or pilot light
as on a furnace, water heater, clothes dryer, etc.
Handle gasoline carefully. It is highly flammable and
careless use could result in serious fire damage to your
person and/or property.
CAUTION: Do not allow grease or oil to contact the
rubber friction wheel or the disc drive plate. If the
disc drive plate or friction wheel come in contact with
grease or oil, damage to the rubber friction wheel will
result.
NOTICE: If grease or oil comes into contact with the disc drive
plate or friction wheel, make sure to clean plate and wheel
thoroughly with an alcohol base solvent.
Drain fuel into approved containers outdoors, away from
open flame.
1.
2.
3.
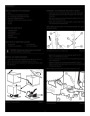
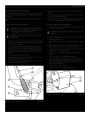
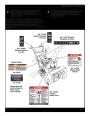
Position speed select lever (E, Figure 11) in first forward gear.
Drain fuel to an approved container.
Stand the snowthrower up on the auger housing end.
NOTE: When the crankcase is filled with oil, do not leave
the snowthrower standing up on the auger housing for an
extended period of time.
If the snow thrower will be stored for thirty (30) days or more at the end of
the snow season, the following steps are recommended to prepare your
snowthrower for storage.
NOTE: Gasoline must be removed or treated to prevent gum
deposits from forming in the tank, filter, hose, and carburetor
during storage.
4.
Remove the bottom panel.
1.
Remove gasoline, by running engine until tank is empty and engine
stops. If you do not want to remove the gasoline, add fuel stabilizer
to any gasoline left in the tank to minimize gum deposits and acids.
If the tank is almost empty, mix stabilizer with fresh gasoline in a
separate container and add some of the mixture to the tank. ALWAYS
FOLLOW INSTRUCTIONS ON STABILIZER CONTAINER. THEN RUN
ENGINE AT LEAST 10 MINUTES AFTER STABILIZER IS ADDED TO
ALLOW MIXTURE TO REACH CARBURETOR. STORE
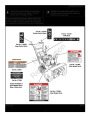
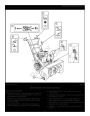
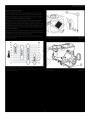
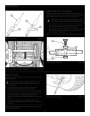
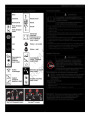
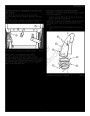
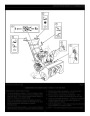
5. Lubricate the chains (A, Figure 38), sprockets (B), and hex shaft (C)
before storage or at the beginning of each season, using a clean rag
dipped in motor oil. Do NOT use grease.
NOTE: Use a clean rag to wipe away any excess oil from the
chains, sprockets, and hex shaft.
6.
Install the bottom panel.
SNOWTHROWER IN SAFE PLACE.
2.
3.
You can help keep your engine (4-cycles only) in good operating
condition by changing oil before storage.
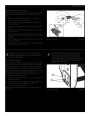
Lubricate the piston/cylinder area. This can be done by first removing
the spark plug and squirting clean engine oil into the spark plug hole.
Then cover the spark plug hole with a rag to absorb oil spray. Next,
rotate the engine by pulling the starter two or three times. Finally,
reinstall spark plug and attach spark plug wire.
A
C
4.
5.
Thoroughly clean the snowthrower.
Lubricate all lubrication points (see “Lubrication” topics in the
MAINTENANCE section).
B
6.
Make sure all nuts, bolts, and screws are securely fastened. Inspect
all visible moving parts for damage, breakage, and wear. Replace if
necessary.
7.
8.
Touch up all rusted or chipped paint surfaces; sand lightly before
painting.
Cover the bare metal parts of the snowthrower housing auger, and the
impeller with rust preventative.
If possible, store your snowthrower indoors and cover it to give
protection from dust and dirt.
On models with folding handles, disconnect the shifter and chute
crank, and loosen the knobs that secure the upper handle. Rotate the
upper handle back.
Lubricating Hex Shaft and Chains
Figure 38
REMOVE FROM STORAGE
9.
1.
Put the upper handle in the operating position, tighten the knobs that
secure the upper handle, and connect the shifter and chute crank.
10.
2.
3.
Fill the fuel tank with a fresh fuel.
Check the spark plug. Make sure the gap is correct. If the spark plug
is worn or damaged, replace before using.
11.
If the machine must be stored outdoors, block up the snowthrower
and ensure the entire machine is off the ground. Cover the
snowthrower with a heavy tarpaulin.
4.
5.
6.
Make sure all fasteners are tight.
Make sure all guards, shields, and covers are in place.
Make sure all adjustments are correct.
29
| Categories | Murray Snow Blower Manuals, Snow Blower Manuals |
|---|---|
| Tags | Murray 1695719 |
| Download File |
|
| Document File Type | |
| Copyright | Attribution Non-commercial |
(0 votes, average: 0 out of 5)