


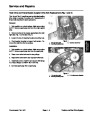
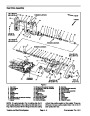

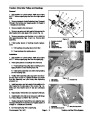

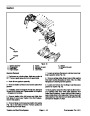
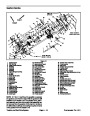
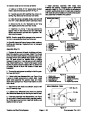


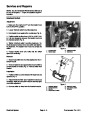


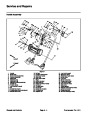

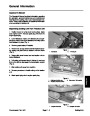


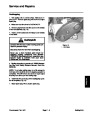
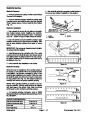


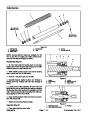

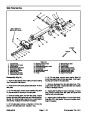


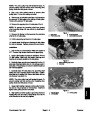
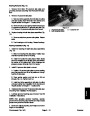

Engine Installation (Fig. 5)
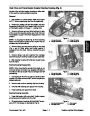
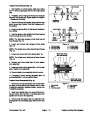
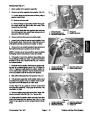
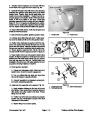
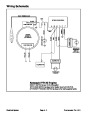
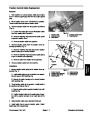
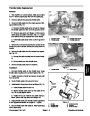
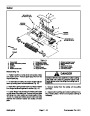
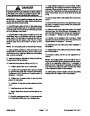
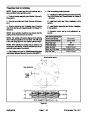
5. Connect electrical connections to engine (Fig. 8):
1.
spark plug wire is not connected to engine spark plug.
Position machine on a level surface. Make sure that
A. Connect wire harness connectors to engine stop
switch and armature wires.
2.
during maintenance or rebuilding are properly installed
to the engine.
Make sure that all parts removed from the engine
B. Secure ground wire to engine with cap screw and
lock washer.
C. Connect wire harness to interlock module.
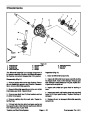
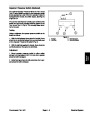
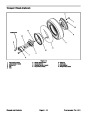
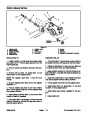
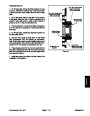
3.
If engine gear was removed from crankshaft, posi-
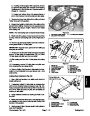
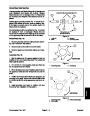
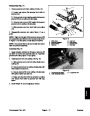
6.
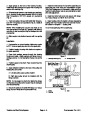
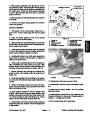
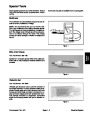
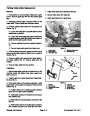
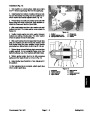
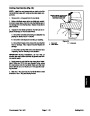
Connect throttle cable to engine.
A. Position throttle cable to engine.
tion square key in crankshaft keyway. Slide gear onto
crankshaft. Secure gear to crankshaft with cap screw,
lock washer and flat washer.
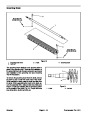
B. Slide throttle cable through throttle cable nut (Fig.
7).
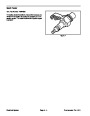
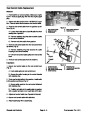
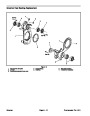
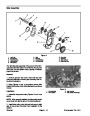
4.
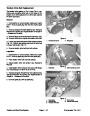
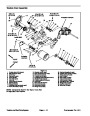
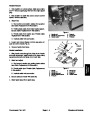
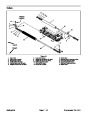
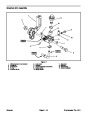
Install engine to engine base (Fig. 5 and 6):
A. Make sure that four (4) set screws are secure in
engine crankcase cover. If set screws were removed
from engine cover, apply Loctite #242 (or equivalent)
to set screw threads, install into engine cover and
tighten securely.
C. Position three (3) washers and cable clamp to
frame (Fig. 6). Secure with cap screw and flange nut.
D. Adjust throttle cable (See Throttle Cable Adjust-
ment in the Adjustment section of this chapter).
Make sure that throttle cable screw is tightened after
cable adjustment.
B. Install new flange gasket (item 2) to set screws on
crankcase cover.
7.
8.
9.
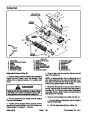
Fill gearbox to proper fluid level.
C. Position engine on the engine base with the drive
gear towards the gearbox assembly.
Check and adjust engine oil level as needed.
D. Slide engine toward gearbox while guiding drive
gear into gearbox input area. Crankshaft may have
to be turned to mesh engine gear teeth with gearbox
input gears.
Attach spark plug wire to the spark plug. Open fuel
shut–off valve.
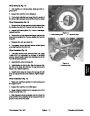
E. Install and finger tighten four (4) flange nuts that
secure gearbox assembly to set screws on engine
crankcase cover.
F. Install four (4) cap screws with flat washers
through the engine and engine base. Put flange nut
on each cap screw and hand tighten.
G. Fully tighten flange nuts that secure gearbox as-
sembly to engine and then tighten flange nuts that
secure engine to engine base.
Engine
Page 3 – 10
Greensmaster Flex 18/21
| Categories | Lawn Mower Manual, Sprinkler and Irrigation Manuals, Toro Sprinkler and Irrigation Manuals |
|---|---|
| Tags | Toro Greensmaster 04018, Toro Greensmaster 04019, Toro Greensmaster 04022, Toro Greensmaster 04024, Toro Greensmaster 04025, Toro Greensmaster 04030, Toro Greensmaster 04031 |
| Download File |
|
| Document Type | Service Manual |
| Language | English |
| Product Brand | Toro. Customer Service Representatives are available by phone:
Monday - Friday 7:30 a.m. to 9:00 p.m. (CDT) - Saturday 8:00 a.m. to 8:00 p.m. (CDT) - Sunday 10:00 a.m. to 8:00 p.m. (CDT)
Canada 1-888-225-4886 USA 1-888-384-9939, Lawn Mower |
| Document File Type | |
| Publisher | toro.com |
| Wikipedia's Page | Toro Company |
| Copyright | Attribution Non-commercial |
(1 votes, average: 3 out of 3)
Lawn and Garden readers have rated Toro 06149SL Models 04018 04019 04030 04022 04024 04025 04031 Service Manual 3.0 out of 3.0 based on 1 product reviews. i gone through your website about Safety Shoes Manufacturers & Distributors
its really amazing. if you want additional information about Safety Shoes Manufacturers & Distributors contact Us.
Safety Shoes Manufacturers & Distributors.