


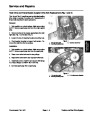


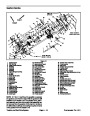


Bedknife Service
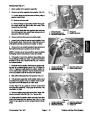
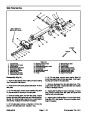
Bedknife Removal
2. After bedknife grinding is complete, install bedbar to
the mower (see Bedbar Installation in this section).
1.
Remove bedbar from cutting unit frame (see Bedbar
Removal in this section).
2.
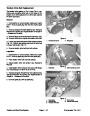
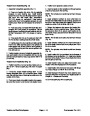
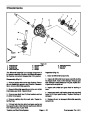
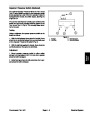
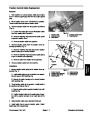
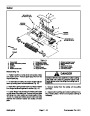
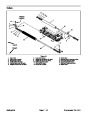
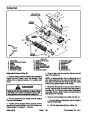
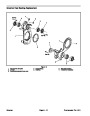
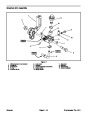
Remove screws that fasten bedknife to bedbar using
a socket wrench and bedknife screw tool (see Special
Tools). Discard screws. Remove bedknife from bedbar
(Fig. 17).
3
2
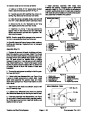
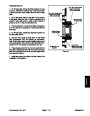
Bedknife Installation
Antiseize
Lubricant
200
(22.6 to 28.2 N–m)
to 250 in–lb
1.
Use a scraper to remove all rust, scale and corrosion
1
from bedbar surface before installing new bedknife.
Also, make sure bedbar threads are clean. If necessary,
use 5/16 – 18UNC 2A tap to chase threads in bedbar.
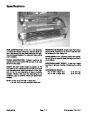
Figure 17
3.
1.
2.
Screw
Bedknife
Bedbar
2.
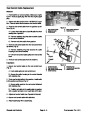
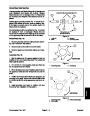
Use new screws to secure bedknife to bedbar. Apply
antiseize lubricant to the screws before installing. Take
care to keep antiseize lubricant from taper on screw
heads.
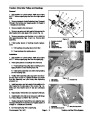
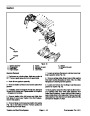
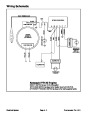
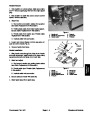
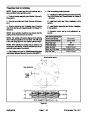
IMPORTANT: Do not use an impact wrench to tight-
en screws into the bedbar.
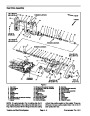
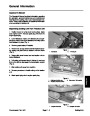
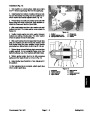
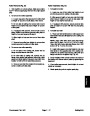
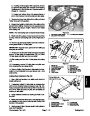
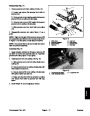
3.
Install all screws but do not tighten fully. Then, using
# TOR510880
a torque wrench and bedknife screw tool, torque screws
from 200 to 250 in–lb (22.6 to 28.2 N–m). Use a torqu-
ing pattern working from the center toward each end of
the bedknife (Fig. 18).
11
9
7
5
3
1
2
4
6
8
10
4.
Grind bedknife after installation onto bedbar.
Figure 18
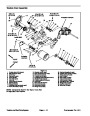
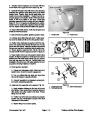
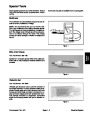
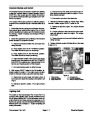
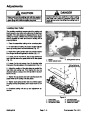
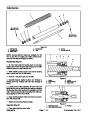
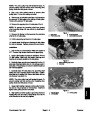
Bedknife Grinding
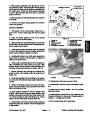
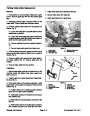
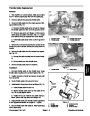
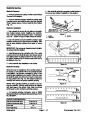
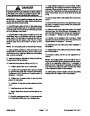
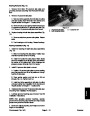
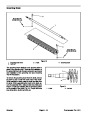
Top Face
Since there can be variations in the mounting surface of
the bedbar, a new bedknife will not be perfectly flat after
it is installed. It is therefore necessary to grind a new
bedknife after installing it to the bedbar. Follow the exist-
ing bedknife angle and grind only enough to make sure
the top surface is true (Fig. 19). The bedbar needs to be
removed from mower for proper bedknife grinding.
Relief Angle
Remove
Burr
Front
Face
Front Angle
Figure 19
NOTE: When grinding bedknife, be careful to not over-
heat the bedknife. Remove small amounts of material
with each pass of the grinder. Also, clean and dress
grinding stone often during the grinding process.
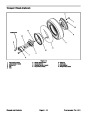
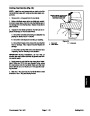
Standard Bedknife
1.
Sharpening Reel and Rotary Mowers Manual, Form
No. 80-300 PT.
For bedknife grinding information, refer to TORO
1.69”
1.88”
(42.9 mm)
Extended Bedknife
Figure 20
Bedknife Grinding Specifications
(47.8 mm)
Standard bedknife relief angle
Extended bedknife relief angle
Front Angle
3o (see Fig. 20)
7o (see Fig. 20)
13o
Front Angle Range
13o to 17o
Cutting Unit
Page 7 – 12
Greensmaster Flex 18/21
| Categories | Lawn Mower Manual, Sprinkler and Irrigation Manuals, Toro Sprinkler and Irrigation Manuals |
|---|---|
| Tags | Toro Greensmaster 04018, Toro Greensmaster 04019, Toro Greensmaster 04022, Toro Greensmaster 04024, Toro Greensmaster 04025, Toro Greensmaster 04030, Toro Greensmaster 04031 |
| Download File |
|
| Document Type | Service Manual |
| Language | English |
| Product Brand | Toro. Customer Service Representatives are available by phone:
Monday - Friday 7:30 a.m. to 9:00 p.m. (CDT) - Saturday 8:00 a.m. to 8:00 p.m. (CDT) - Sunday 10:00 a.m. to 8:00 p.m. (CDT)
Canada 1-888-225-4886 USA 1-888-384-9939, Lawn Mower |
| Document File Type | |
| Publisher | toro.com |
| Wikipedia's Page | Toro Company |
| Copyright | Attribution Non-commercial |
(1 votes, average: 3 out of 3)
Lawn and Garden readers have rated Toro 06149SL Models 04018 04019 04030 04022 04024 04025 04031 Service Manual 3.0 out of 3.0 based on 1 product reviews. i gone through your website about Safety Shoes Manufacturers & Distributors
its really amazing. if you want additional information about Safety Shoes Manufacturers & Distributors contact Us.
Safety Shoes Manufacturers & Distributors.