


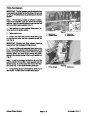


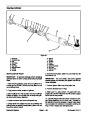


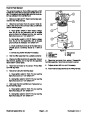


Bedknife/Bedbar
Disassembly
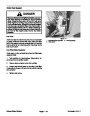
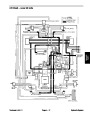
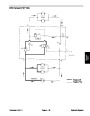
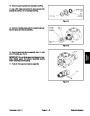
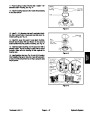
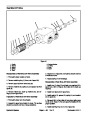
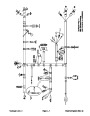
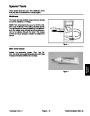
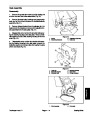
1.
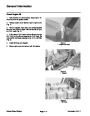
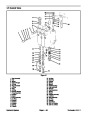
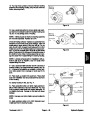
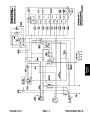
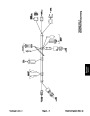
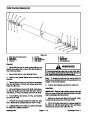
Remove shoulder bolts, bushings and spacers from
each end of the unit. Remove bedbar/bedknife assem-
bly (Fig. 16).
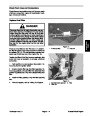
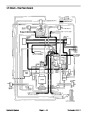
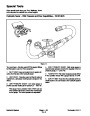
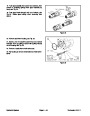
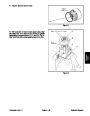
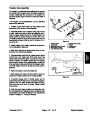
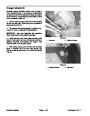
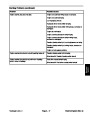
2.
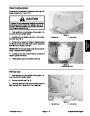
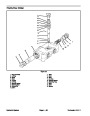
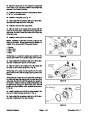
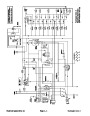
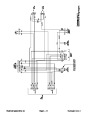
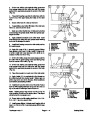
Remove mounting screws for the bedknife. Sepa-
rate bedknife from the bedbar. Discard screws (Fig. 17).
Assembly
1.
Clean bedknife mounting face on the bedbar thor-
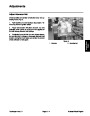
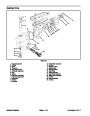
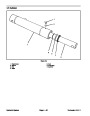
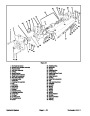
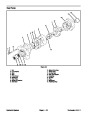
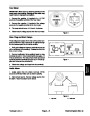
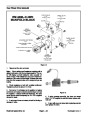
Figure 16
Shoulder bolt (2 each side)
oughly of all rust and scale. Remove any material on the
mounting face of the bedbar that will affect a good
match−up with the bedknife.
1.
2.
3. Spacer
Bushing
2.
Before installation, apply a coating of anti−seize lu-
bricant to the threads of the bedknife mounting screws.
IMPORTANT: Do not use an impact wrench to tight-
en screws into the bedbar.
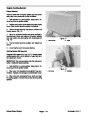
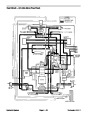
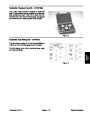
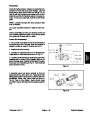
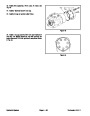
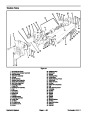
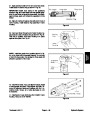
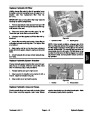
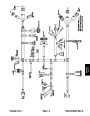
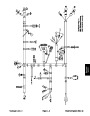
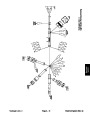
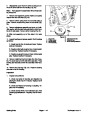
3.
Begin with the center screw and tighten alternate
screws toward each end using a torque wrench and
bedknife screw tool. Tighten screws to a torque of 250
to 300 in−lb (288 to 345 kg−m). Make sure bedknife is
flat against the bedbar (Fig. 18).
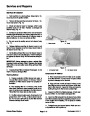
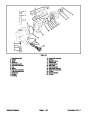
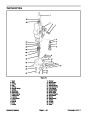
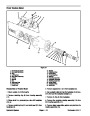
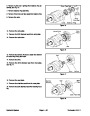
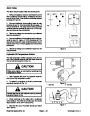
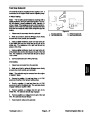
Figure 17
3.
4.
4.
Install bedbar/bedknife assembly to the cutting unit.
1.
2.
Bedbar
Bedknife
Mounting screws
Mounting fasteners
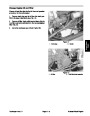
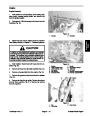
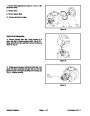
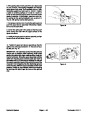
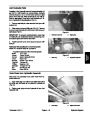
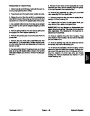
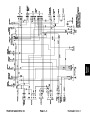
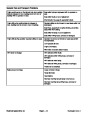
Grinding
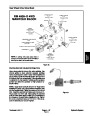
Variations in the mounting surface of a bedbar causes
a new bedknife not be perfectly flat after installation.
This makes it is necessary to backlap or grind a new
bedknife after installation to the bedbar. Follow existing
angle that was ground into the bedknife. Grind only
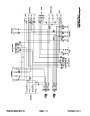
enough to make sure the top surface is true (Fig. 19).
1.
Remove the bedbar from the cutting unit.
2.
Keep the bedknife fastened to the bedbar when
grinding.
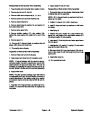
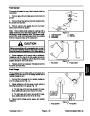
Figure 18
2.
3.
set−up and operation of the grinder.
Follow the grinder manufacturer’s instructions for
1.
Torque wrench
Bedknife screw tool
Note:
bedknife. Remove small amounts of material with each
pass of the grinder.
When grinding, be careful to not overheat the
Top Face
Remove
Burr
Relief Angle
Front
Face
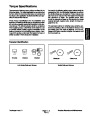
Bedknife Grinding Specifications
Relief Angle
5o
Relief Angle Range
Front Angle
3o to 6o
15o
Front Angle
Figure 19
Front Angle Range
13o to 17o
Cutting Units
Page 7 − 10
Reelmaster 4000−D
| Categories | Lawn Mower Manual, Sprinkler and Irrigation Manuals, Toro Sprinkler and Irrigation Manuals |
|---|---|
| Tags | Toro 4000 D, Toro 98958SL |
| Download File |
|
| Document Type | Catalog |
| Language | English |
| Product Brand | Toro. Customer Service Representatives are available by phone:
Monday - Friday 7:30 a.m. to 9:00 p.m. (CDT) - Saturday 8:00 a.m. to 8:00 p.m. (CDT) - Sunday 10:00 a.m. to 8:00 p.m. (CDT)
Canada 1-888-225-4886 USA 1-888-384-9939, Lawn Mower |
| Document File Type | |
| Publisher | toro.com |
| Wikipedia's Page | Toro Company |
| Copyright | Attribution Non-commercial |
(0 votes, average: 0 out of 5)