


4
2
1
3.
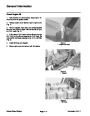
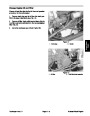
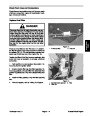
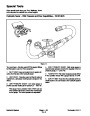
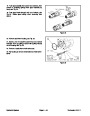
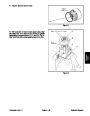
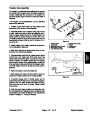
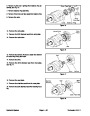
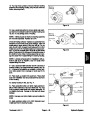
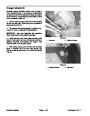
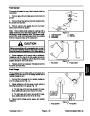
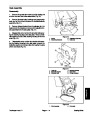
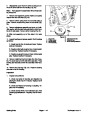
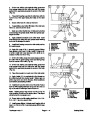
On the rear, wiehle, and sectional rollers, press new
inner grease seals into the roller tube with the garter
spring of the seal facing towards the center of the roller
(Fig. 30).
8
7
12
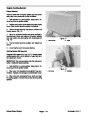
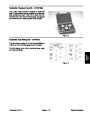
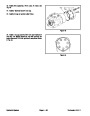
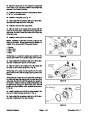
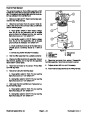
4.
Press both bearing cups into the roller tube with the
narrow end of the taper facing the inside of the roller
tube.
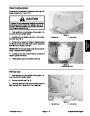
5.
6.
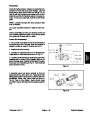
Secure roller tube in a vise so it is level.
If assembling a rear roller, fill inside of the roller tube
with 6 oz. (200 ml) of SAE 90 oil.
10 11
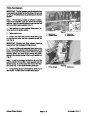
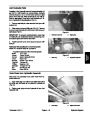
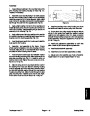
7.
Make sure roller shaft is free of nicks and burrs that
could damage the grease seals. Make sure grease pas-
sages are clear.
6
9
3
8.
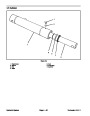
Apply antiseize lubricant to the roller shaft. Insert
5
shaft through the roller tube and grease seals making
sure not to damage the seals.
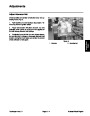
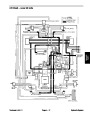
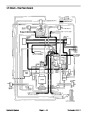
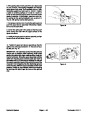
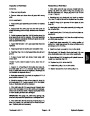
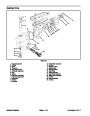
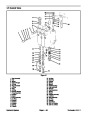
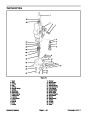
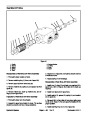
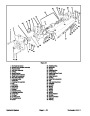
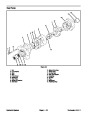
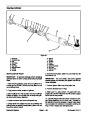
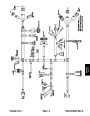
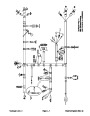
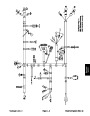
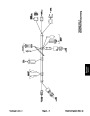
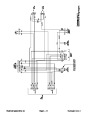
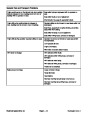
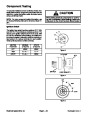
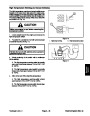
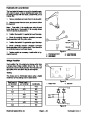
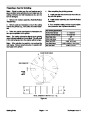
Figure 29
1.
Inner grease seal
Roller tube
Bearing cup
Roller shaft
Bearing cones
O−ring
7.
8.
9.
10. Jam nut
11. Lock nut
Wear sleeve
Outer grease seal
Thrust washer
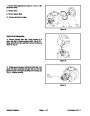
9.
the bearing cups.
Install both bearing cones to the roller shaft and into
2.
3.
4.
5.
6.
10.
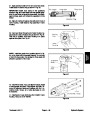
Apply thin coat of No. 2 general purpose lithium
12. Grease fitting
base grease to both new O−rings. Install O−rings to roll-
er shaft. Install both wear sleeves to the shaft so re-
cessed end fits over the O−ring.
4
1
8
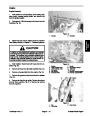
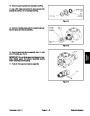
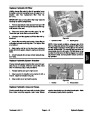
11.
the roller with the garter spring of the seal facing away
from the center of the roller (Fig. 29).
On the front roller, press new outer grease seal into
2
7
12
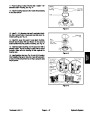
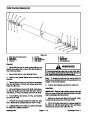
12.
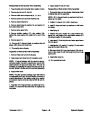
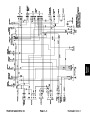
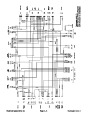
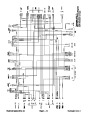
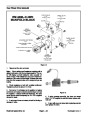
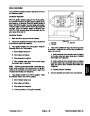
On the rear, wiehle, and sectional rollers, press new
outer grease seal into the roller tube with the garter
spring of the seal facing towards the center of the roller
(Fig. 30).
13.
14.
the roller shaft with the shorter length. Tighten jam nut
all the way to the end of the threads. Allow Loctite to
cure before proceeding further.
Place thrust washer on each end of the roller shaft.
Apply Loctite 271 (or equivalent) to the threads on
10 11
6
9
15.
lock nut while rotating shaft from 20 to 25 ft−lb (2.8 to 3.5
kg−m) to seat the bearings. Back off lock nut.
Install lock nut to the other end of the shaft. Torque
3
5
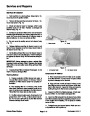
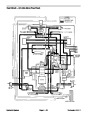
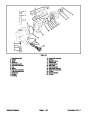
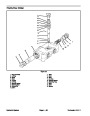
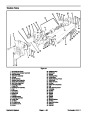
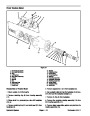
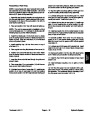
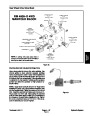
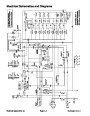
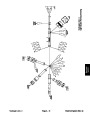
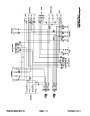
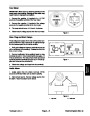
Figure 30
1.
2.
3.
4.
5.
6.
Inner grease seal
Roller tube
Bearing cup
Roller shaft
Bearing cones
O−ring
7.
8.
9.
10. Jam nut
11. Lock nut
Wear sleeve
Outer grease seal
Thrust washer
Note:
when torquing the lock nut the second time. This torque
will fall once the nut starts to turn.
Starting torque may exceed 10 ft−lb (1.4 kg−m)
12. Grease fitting
16.
Torque lock nut while rotating shaft from 10 to 15 ft−
lb (1.4 to 2.1 kg−m) a second time.
17.
Install grease fittings. Lubricate each bearing with at
least 1 oz. (33 ml) of No. 2 general purpose lithium base
grease.
Reelmaster 4000−D
Page 7 − 17
Cutting Units
| Categories | Lawn Mower Manual, Sprinkler and Irrigation Manuals, Toro Sprinkler and Irrigation Manuals |
|---|---|
| Tags | Toro 4000 D, Toro 98958SL |
| Download File |
|
| Document Type | Catalog |
| Language | English |
| Product Brand | Toro. Customer Service Representatives are available by phone:
Monday - Friday 7:30 a.m. to 9:00 p.m. (CDT) - Saturday 8:00 a.m. to 8:00 p.m. (CDT) - Sunday 10:00 a.m. to 8:00 p.m. (CDT)
Canada 1-888-225-4886 USA 1-888-384-9939, Lawn Mower |
| Document File Type | |
| Publisher | toro.com |
| Wikipedia's Page | Toro Company |
| Copyright | Attribution Non-commercial |
(0 votes, average: 0 out of 5)