


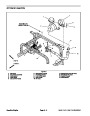
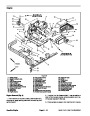
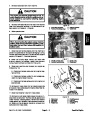


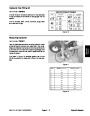
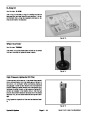
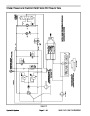
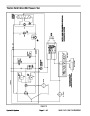


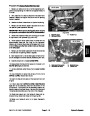
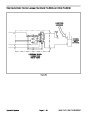


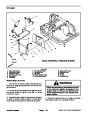
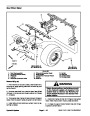

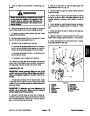


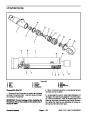
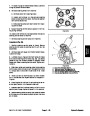

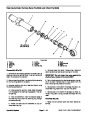


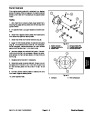
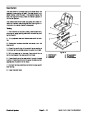


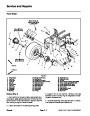

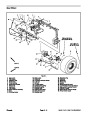
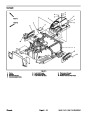
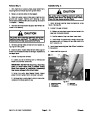
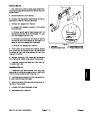
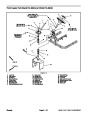

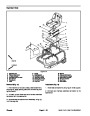


Removal (Fig. 14)
Park machine on a level surface, lower attachment,
stop engine, apply parking brake and remove key from
ignition switch.
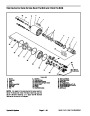
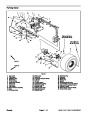
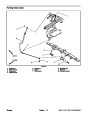
Installation (Fig. 14)
1.
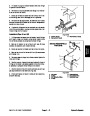
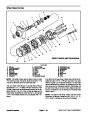
1. If removed, install steering pivot, steering sleeve and
bearings to machine:
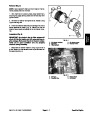
A. If bearing cups were removed from frame, press
new bearing cups into frame making sure that cups
are pressed fully to the shoulder in the frame.
2.
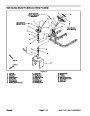
Remove fuel tank from machine (see Fuel Tank Re-
moval in the Service and Repairs section of Chapter 3
–
Engine).
B. Pack bearing cones with grease.
3.
this section).
Remove front wheel (see Front Wheel Removal in
C. Place upper bearing cone into upper bearing cup.
Slide steering sleeve down through upper bearing
and frame.
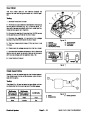
4.
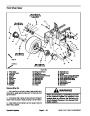
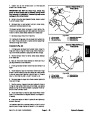
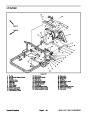
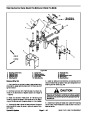
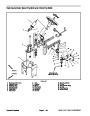
Remove hose guide from castor fork. Carefully posi-
tion hydraulic hoses away from fork taking care to not
damage hydraulic lines.
D. Place lower bearing cone on bottom of steering
sleeve.
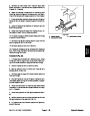
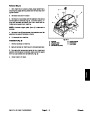
5.
der ball joint to castor fork. Separate steering ball joint
from castor fork.
Remove two (2) jam nuts that secure steering cylin-
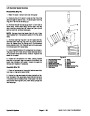
E. Install steering nut onto threads of steering
sleeve. Torque steering nut from 60 to 90 in–lb (6.8 to
10.2
N–m).
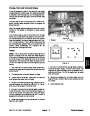
6.
7.
castor fork to steering pivot. Remove castor fork from
machine.
Support castor fork to prevent it from falling
F. Apply Loctite #242 (or equivalent) to set screw.
Tighten set screw into steering nut to secure assem-
bly. Torque set screw from 90 to 120 in–lb (10.2 to
13.6 N–m).
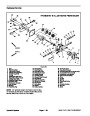
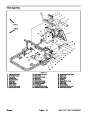
Remove four (4) cap screws (item 15) that secure
8.
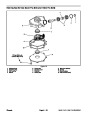
and bearings from machine:
If necessary, remove steering pivot, steering sleeve
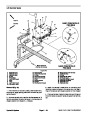
G. Position steering pivot to frame. Slide cap screw
down through steering pivot and steering sleeve.
Install lock nut and torque from 150 to 200 ft–lb (203
to 271 N–m).
A. Remove lock nut (item 13) from cap screw (item
7)
that retains steering pivot.
2.
place with four (4) cap screws (item 15).
Position castor fork to steering pivot and secure in
B. Slide cap screw from steering pivot and remove
steering pivot from frame.
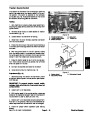
3.
and balljoint boss in front castor fork.
Thoroughly clean tapers of steering cylinder balljoint
C. Loosen set screw in steering nut.
D. Remove steering nut and lower bearing cone
from bottom of steering sleeve.
4.
Position steering cylinder ball joint to castor fork. Se-
cure steering cylinder balljoint to front castor fork with
two (2) jam nuts. Install first jam nut onto cylinder ball
joint threads and torque from 65 to 85 ft–lb (88 to 115
N–m). Then, while retaining first jam nut with wrench,
install and torque second jam nut from 65 to 85 ft–lb (88
to 115 N–m).
E. Remove steering sleeve from frame.
F. Remove upper bearing cone.
G. Clean and inspect bearing cups and cones. If
wear or damage is identified, replace bearings.
5.
Install front wheel (see Front Wheel Installation in
this section).
H. If necessary, remove bearing cups from machine
frame.
6.
Carefully position hydraulic hoses to fork and install
hose guide.
7.
tion in the Service and Repairs section of Chapter 3 –
Engine).
Install fuel tank to machine (see Fuel Tank Installa-
Sand Pro & Infield Pro 3040/5040
Page 6 – 25
Chassis
| Categories | Lawn Mower Manual, Sprinkler and Irrigation Manuals, Toro Sprinkler and Irrigation Manuals |
|---|---|
| Tags | Toro 3040, Toro 5040 |
| Download File |
|
| Document Type | Service Manual |
| Language | English |
| Product Brand | Toro. Customer Service Representatives are available by phone:
Monday - Friday 7:30 a.m. to 9:00 p.m. (CDT) - Saturday 8:00 a.m. to 8:00 p.m. (CDT) - Sunday 10:00 a.m. to 8:00 p.m. (CDT)
Canada 1-888-225-4886 USA 1-888-384-9939, Lawn Mower |
| Document File Type | |
| Publisher | toro.com |
| Wikipedia's Page | Toro Company |
| Copyright | Attribution Non-commercial |
(0 votes, average: 0 out of 5)