


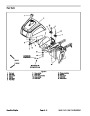
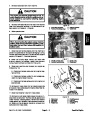


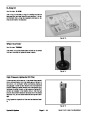
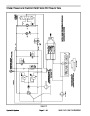
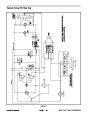

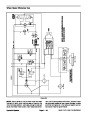

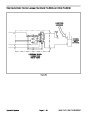


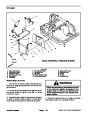
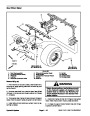


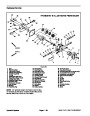

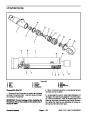
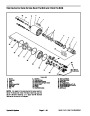

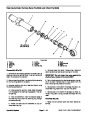

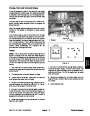


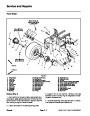

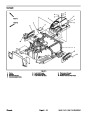
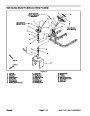
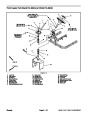


Fuel Tank Installation (Fig. 6)
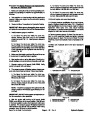
If carburetor was removed from engine for cleaning,
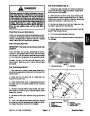
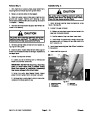
DANGER
1.
install carburetor (see Briggs and Stratton Repair Manu-
al at the end of this chapter).
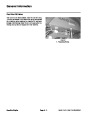
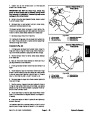
Because gasoline is highly flammable, use cau-
tion when storing or handling it. Do not smoke
while filling the fuel tank. Do not fill fuel tank
while engine is running, hot or when machine is
in an enclosed area. Always fill fuel tank outside
and clean up any spilled fuel before starting the
engine. Store fuel in a clean, safety–approved
container and keep fuel cap in place. Use gaso-
line for the engine only; not for any other
purpose.
2.
Install fuel tank to frame using Figure 6 as a guide.
Apply antiseize lubricant to cap screw (item 14) that se-
cures front of fuel tank to machine. Install and torque cap
screw from 30 to 60 in–lb (3.4 to 6.8 N–m).
3.
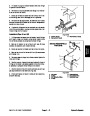
fuel hose is secured with hose clamps.
Connect fuel hose to fuel filter inlet. Make sure that
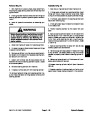
4.
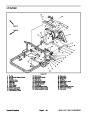
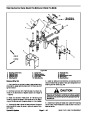
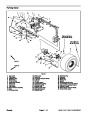
Position panel to fuel tank and secure with three (3)
washer head screws (Fig. 8).
Check Fuel Lines and Connections
5.
6.
Fill fuel tank (see Operator’s Manual).
Check fuel lines and connections periodically as recom-
mended in the Operator’s Manual. Check lines for dete-
rioration, damage, leaks or loose connections. Replace
hoses, clamps and connections as necessary.
Open fuel shut off valve and check for any signs of
fuel leakage.
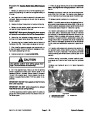
Drain and Clean Fuel Tank
IMPORTANT: If fuel tank is to be drained, drain fuel
outdoors.
2
Drain and clean the fuel tank periodically as recom-
mended in the Operator’s Manual. Also, drain and clean
the fuel tank if the fuel system becomes contaminated
or if the machine is to be stored for an extended period.
1
To clean fuel tank, flush tank and fuel hoses out with
clean solvent. Make sure tank is free of contaminates
and debris.
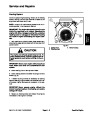
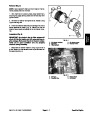
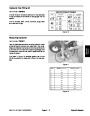
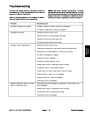
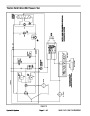
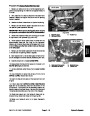
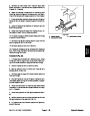
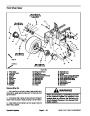
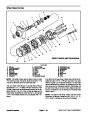
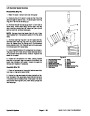
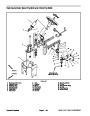
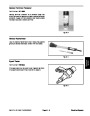
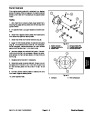
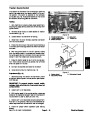
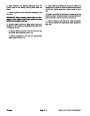
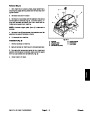
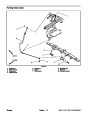
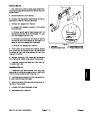
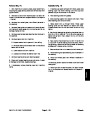
Figure 7
1.
Fuel shut off valve
2.
Fuel filter
Fuel Tank Removal (Fig. 6)
1.
stop engine, apply parking brake and remove key from
ignition switch.
Park machine on a level surface, lower attachment,
1
2
1
2.
hose from fuel filter inlet.
Close fuel shut off valve (Fig. 7). Disconnect fuel
7
3.
and open fuel shut off valve to allow fuel tank to drain
completely.
Place disconnected hose in appropriate container
2
6
4.
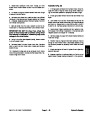
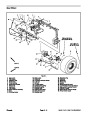
Remove three (3) washer head screws that retain
dash panel to fuel tank (Fig. 8). Carefully position panel
away from fuel tank.
4
5.
Remove fuel tank from machine using Figure 6 as a
guide.
5
3
5
6.
and cleaning may be necessary (see Briggs and Strat-
ton Repair Manual at the end of this chapter).
If fuel in tank was contaminated, carburetor removal
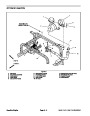
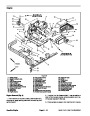
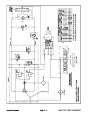
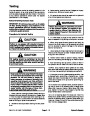
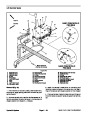
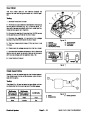
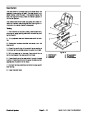
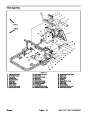
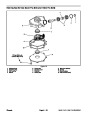
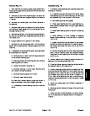
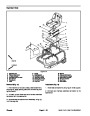
Figure 8
5.
6.
7.
1.
2.
3.
4.
Washer head screw
Screw
Lock nut
Throttle lever/cable
Ignition switch
Dash panel
Choke lever/cable
Sand Pro & Infield Pro 3040/5040
Page 3 – 9
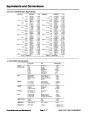
Gasoline Engine
| Categories | Lawn Mower Manual, Sprinkler and Irrigation Manuals, Toro Sprinkler and Irrigation Manuals |
|---|---|
| Tags | Toro 3040, Toro 5040 |
| Download File |
|
| Document Type | Service Manual |
| Language | English |
| Product Brand | Toro. Customer Service Representatives are available by phone:
Monday - Friday 7:30 a.m. to 9:00 p.m. (CDT) - Saturday 8:00 a.m. to 8:00 p.m. (CDT) - Sunday 10:00 a.m. to 8:00 p.m. (CDT)
Canada 1-888-225-4886 USA 1-888-384-9939, Lawn Mower |
| Document File Type | |
| Publisher | toro.com |
| Wikipedia's Page | Toro Company |
| Copyright | Attribution Non-commercial |
(0 votes, average: 0 out of 5)