


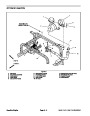
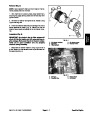
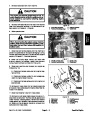


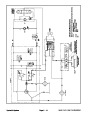

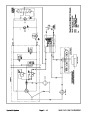


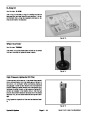
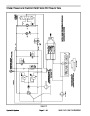
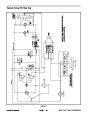


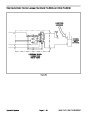


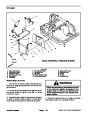
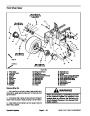
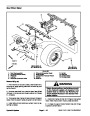

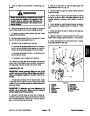


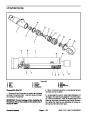
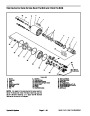

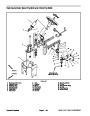
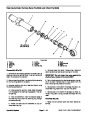


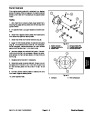
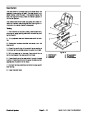


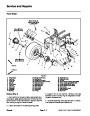

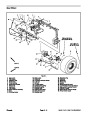
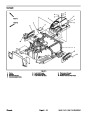
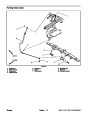
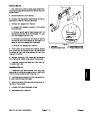
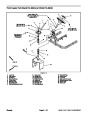

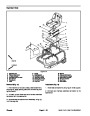


Removal (Fig. 57)
Park machine on a level surface, lower attachment,
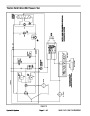
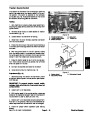
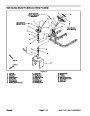
Installation (Fig. 57)
1.
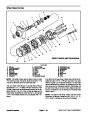
1. Coat new o–rings lightly with clean hydraulic oil.
stop engine, apply parking brake and remove key from
ignition switch.
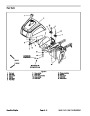
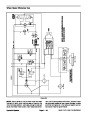
2.
fittings with new o–rings to cylinder using notes made
during the removal process to properly orientate fittings.
If fittings were removed from steering cylinder, install
2.
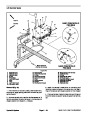
Thoroughly clean hydraulic hose ends and fittings on
steering cylinder to prevent hydraulic system contami-
nation.
3.
secure with retaining ring.
If removed, press balljoint into steering cylinder and
3.
poses.
Label all hydraulic connections for assembly pur-
4.
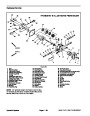
in front castor fork.
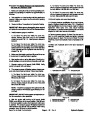
Thoroughly clean taper of balljoint and balljoint boss
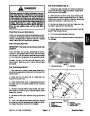
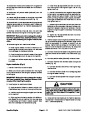
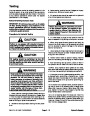
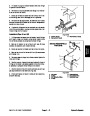
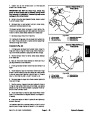
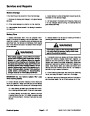
WARNING
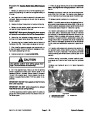
5. Position steering cylinder to front castor fork and
yoke.
6.
Secure steering cylinder balljoint to front castor fork
Before disconnecting or performing any work
on the hydraulic system, all pressure in the
system must be relieved. See Relieving Hy-
draulic System Pressure in the General Infor-
mation section.
with two (2) jam nuts. Install first jam nut onto cylinder
balljoint threads and torque from 65 to 80 ft–lb (88 to 108
N–m). Then, while retaining first jam nut with wrench,
install and torque second jam nut from 65 to 80 ft–lb (88
to 108 N–m).
4.
5.
Disconnect hydraulic hoses from steering cylinder.
Put caps or plugs on disconnected hoses and fittings
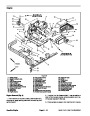
7.
screws, spacers and flat washers.
Secure steering cylinder to yoke with two (2) cap
to prevent contamination.
8.
Remove plugs and caps placed in hoses and fittings
during removal. Use labels placed during the removal
process to properly install hoses to steering cylinder fit-
tings.
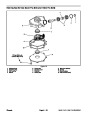
6.
der balljoint to front castor fork. Separate steering cylin-
der ball joint from front fork.
Remove two (2) jam nuts that secure steering cylin-
9.
essary (see Operator’s Manual).
Make sure hydraulic tank is full. Add correct oil if nec-
7.
washers that secure steering cylinder to yoke. Locate
and retrieve spacers.
Loosen and remove two (2) cap screws and flat
10.Grease
Manual).
steering cylinder balljoint (see Operator’s
8.
9.
Remove steering cylinder from machine.
11.
system (see Charge Hydraulic System in this section).
Operate machine functions slowly until air is out of
If needed, remove ball joint from steering cylinder.
10.Remove
hydraulic fittings from steering cylinder if re-
quired. Note orientation of fittings before removing from
steering cylinder.
Sand Pro & Infield Pro 3040/5040
Page 4 – 69
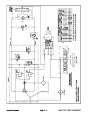
Hydraulic System
| Categories | Lawn Mower Manual, Sprinkler and Irrigation Manuals, Toro Sprinkler and Irrigation Manuals |
|---|---|
| Tags | Toro 3040, Toro 5040 |
| Download File |
|
| Document Type | Service Manual |
| Language | English |
| Product Brand | Toro. Customer Service Representatives are available by phone:
Monday - Friday 7:30 a.m. to 9:00 p.m. (CDT) - Saturday 8:00 a.m. to 8:00 p.m. (CDT) - Sunday 10:00 a.m. to 8:00 p.m. (CDT)
Canada 1-888-225-4886 USA 1-888-384-9939, Lawn Mower |
| Document File Type | |
| Publisher | toro.com |
| Wikipedia's Page | Toro Company |
| Copyright | Attribution Non-commercial |
(0 votes, average: 0 out of 5)