


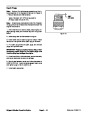

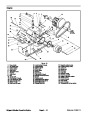


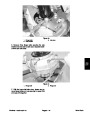


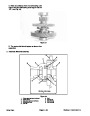
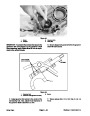


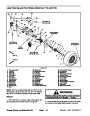


Front Hood
2
3 4
30
1
5
6
7
8
9
16
26
2
9
10
28 12
11
27
15
18
25
11
24
23
13
14
12
22
21
11
12
1
20
9
17
31
32
15
RIGHT
FRONT
11
16
12
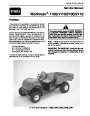
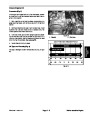
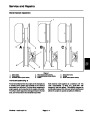
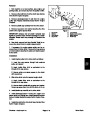
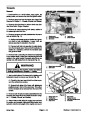
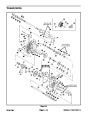
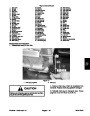
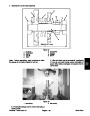
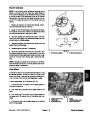
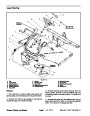
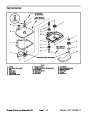
Figure 29
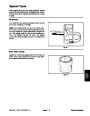
1.
Decal
Power point
Cap
Ignition switch
Ignition key
Hole plug
Oil light
12. Flange lock nut
13. Fender (LH) (shown)
14. Fender (RH) (not shown)
15. Self tapping screw
16. Flange lock nut
17. Decal
23. Headlight mount
24. Decal
25. Self tapping screw
26. Hood
27. Manuals tube
28. Hex flange head screw
29. R–clamp
30. Dash
31. Flat washer
32. Cap screw
2.
3.
4.
5.
6.
7.
18. Reflector
8.
Light switch
Hourmeter
Decal
19. Lock washer
20. Cap screw
21. Plastic bumper
22. Headlight
9.
10.
11.
Hex flange head screw
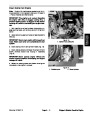
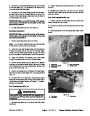
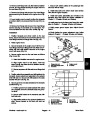
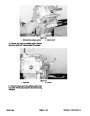
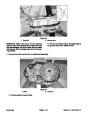
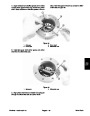
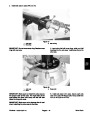
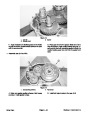
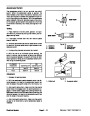
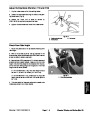
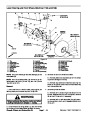
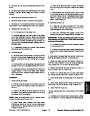
Removal
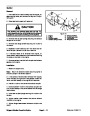
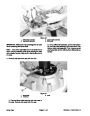
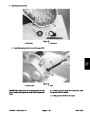
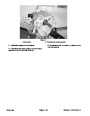
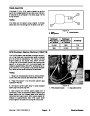
Installation
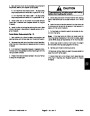
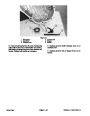
1.
parking brake, and remove key from the ignition.
Park machine on a level surface, stop engine, set
NOTE: Do not tighten fasteners securing the hood until
all fasteners are in place.
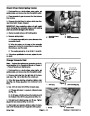
2.
head light.
Remove screws attaching the wire harness to each
1. Position hood to the machine. Secure hood to the
dash with both hex flange head screws (11).
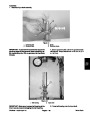
3.
center–lower hood to the front frame support.
Remove both self tapping screws (15) securing the
2. Secure hood to the top of each fender with two hex
flange head screws (11) and flange lock nuts (12).
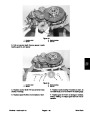
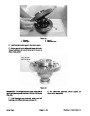
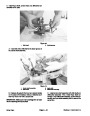
4.
and cap screw (32) securing the hood to each fender
front.
Remove flange lock nut (12), both flat washers (31),
3. Secure hood to each fender front with cap screw
(32), two flat washers (31), and flange lock nut (12).
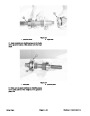
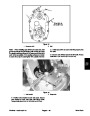
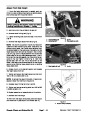
4.
Secure center–lower hood to the front frame support
5.
head screws (11) securing the hood to the top of each
fender.
Remove both flange lock nuts (12) and hex flange
with two self tapping screws (15).
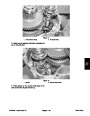
5.
Connect each headlight to the wire harness with
screws. Tighten all fasteners securing the hood.
6.
the hood to the dash. Remove hood from the vehicle.
Chassis, Wheels, and Brakes (Rev. B)
Remove both hex flange head screws (11) securing
Page 7 – 44
Workman 1100/1110/2100/2110
| Categories | Lawn Mower Manual, Sprinkler and Irrigation Manuals, Toro Sprinkler and Irrigation Manuals |
|---|---|
| Tags | Toro Workman 1100, Toro Workman 1110, Toro Workman 2100, Toro Workman 2110 |
| Download File |
|
| Document Type | Catalog |
| Language | English |
| Product Brand | Toro. Customer Service Representatives are available by phone:
Monday - Friday 7:30 a.m. to 9:00 p.m. (CDT) - Saturday 8:00 a.m. to 8:00 p.m. (CDT) - Sunday 10:00 a.m. to 8:00 p.m. (CDT)
Canada 1-888-225-4886 USA 1-888-384-9939, Lawn Mower |
| Document File Type | |
| Publisher | toro.com |
| Wikipedia's Page | Toro Company |
| Copyright | Attribution Non-commercial |
(0 votes, average: 0 out of 5)