


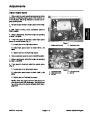

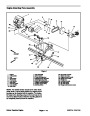
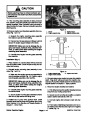


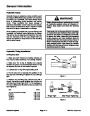
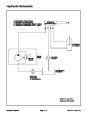
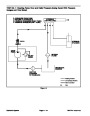


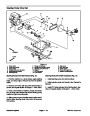

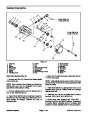


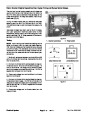


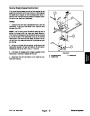


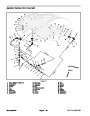
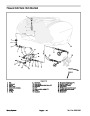

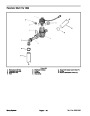
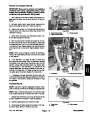
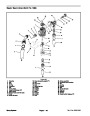


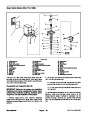


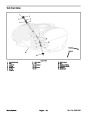
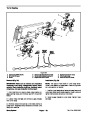
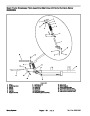
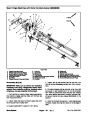
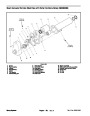


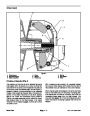


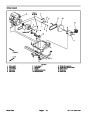
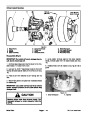

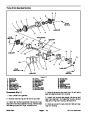

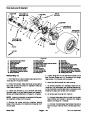

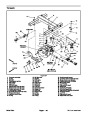
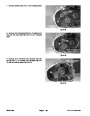
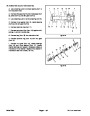
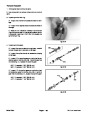


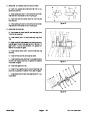
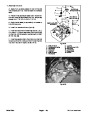


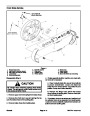
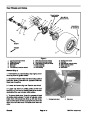


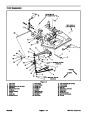
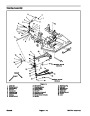
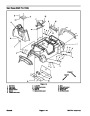


Disassembly (Fig. 18)
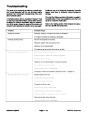
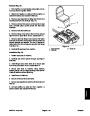
2. Check all parts for burrs, scoring, nicks, etc.
1.
2.
3.
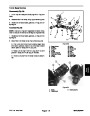
Remove shaft seal (see Shaft Seal Replacement).
Remove relief valve (see Relief Valve Service).
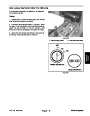
Matchmark the gear housing with the stator for prop-
3. Clean seal bore and drive shaft of pump so they are
free of any foreign material.
4.
Check needle bearings in stator and gear housing for
excessive wear or damage. If gears (Items 19 and 20),
needle bearings (Item 15), gear housing, or stator are
excessively worn, scored, or damaged, replace pump.
er orientation of these parts during reassembly.
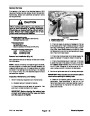
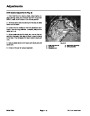
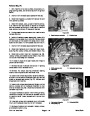
IMPORTANT: Use caution when using a vise to
avoid distorting any pump components.
5.
Check bearing (Item 4) for smooth operation. Re-
place bearing if loose on shaft or noisy when rotated.
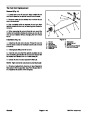
4.
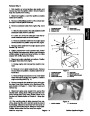
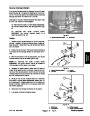
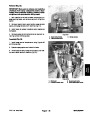
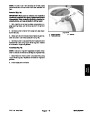
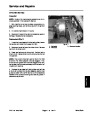
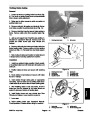
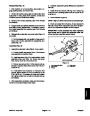
Secure flange end of pump in a vise with drive shaft
facing down.
6.
Inspect woodruff key (Item 11) and keyway in shaft
for wear or damage and replace parts as necessary.
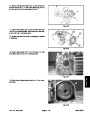
5.
6.
Remove eight (8) screws.
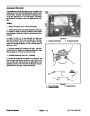
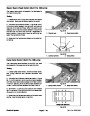
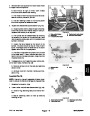
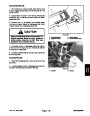
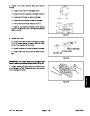
Support gear housing (Item 18) and gently tap hous-
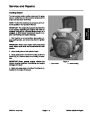
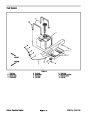
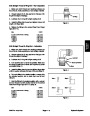
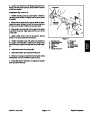
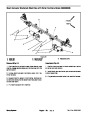
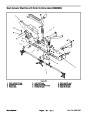
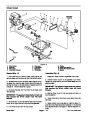
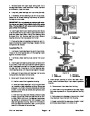
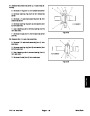
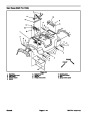
Reassembly (Fig. 18)
ing with a soft face hammer to loosen from stator (Item
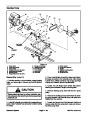
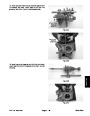
Separate gear housing from stator. Be careful not
to drop any parts or disengage gear mesh.
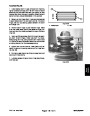
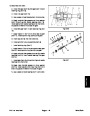
IMPORTANT: When installing bearing and crescent
rings on drive shaft, do not slide bearing or crescent
rings over seal area of drive shaft.
24).
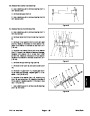
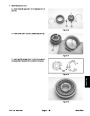
7.
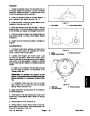
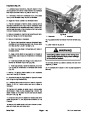
marking dye to mating teeth to retain “timing” and loca-
tion for reassembly purposes.
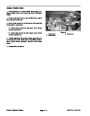
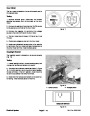
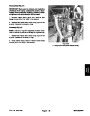
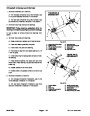
Before removing gears (Items 19 and 20), apply
1.
then install bearing (Item 4) and second crescent ring.
Slide drive shaft and bearing assembly into stator.
Install outer crescent ring on drive shaft (Item 14),
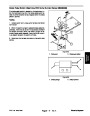
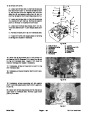
8.
13)
Remove drive gear (Item 20) and woodruff key (Item
from drive shaft.
2.
Install spacer (Item 3) on drive shaft.
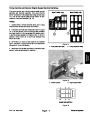
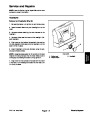
3.
seal during installation. Position new seal (Item 2) onto
shaft with part number facing out.
Use a seal sleeve or tape on drive shaft to protect
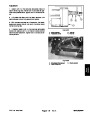
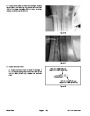
9.
from stator. Remove crescent rings and then idler gear
(Item 19) from idler shaft.
Remove idler shaft assembly (Items 12, 19, and 21)
4.
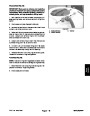
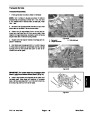
sure seal is installed square with seal bore and that seal
is pressed just below retaining ring groove.
Use a seal installation tool to install new seal. Make
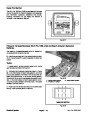
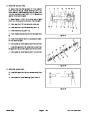
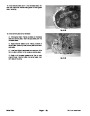
10.Locate
or gear housing.
and remove dowel pins (Item 23) from stator
IMPORTANT: When removing gasket (Item 22) from
pump, note gasket color. Use new gasket of same
color for reassembly.
5.
Install retaining ring (Item 1).
6. Install woodruff key (Item 13), then apply clean Dex-
ron III ATF to drive gear (Item 20), and install to drive
shaft.
11.
tor.
Remove gasket from between gear housing and sta-
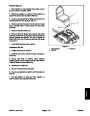
7.
Install one crescent ring to idler shaft (Item 21), then
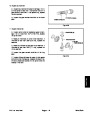
12.Remove
retaining ring (Item 1) from stator.
install idler gear (Item 19) and second crescent ring. Ap-
ply clean Dexron III ATF to gear and idler shaft assem-
bly, then install into stator maintaining the original timing
and locations.
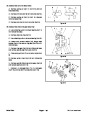
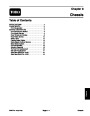
IMPORTANT: Do not try to pry seal out of stator.
This can damage the shaft seal bore.
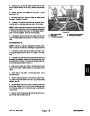
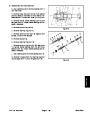
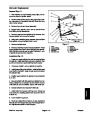
13.Press
drive shaft and bearing assembly (Items 2, 3,
8.
color gasket as the removed gasket.
Install new gasket (Item 22) onto stator. Use same
14,
12, and 4) out of stator. Remove and discard seal
(Item 2). Remove spacer (Item 3) from drive shaft.
9.
to stator using the matchmark made during disassem-
bly. Install screws and tighten in a crossing pattern from
Install dowel pins (Item 23). Assemble gear housing
IMPORTANT: When removing bearing and crescent
rings from drive shaft, do not slide bearing or cres-
cent rings over seal area of drive shaft.
114
to 150 in–lb (13 to 17 N–m).
relief valve (see Relief Valve Service).
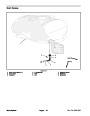
Place a small amount of Dexron III ATF in pump inlet
14.Remove
inner crescent ring, then remove bearing
10.Install
and second ring from drive shaft.
11.
and rotate pump one revolution. If binding is noted, dis-
assemble pump and check for assembly problems.
Inspection
1.
Wash all parts in cleaning solvent.
Multi Pro 1200/1250
Page 4 – 23
Hydraulic System
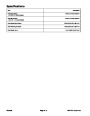
| Categories | Lawn Mower Manual, Sprinkler and Irrigation Manuals, Toro Sprinkler and Irrigation Manuals |
|---|---|
| Tags | Toro Multi Pro 1200, Toro Multi Pro 1250 |
| Download File |
|
| Document Type | Service Manual |
| Language | English |
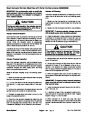
| Product Brand | Toro. Customer Service Representatives are available by phone:
Monday - Friday 7:30 a.m. to 9:00 p.m. (CDT) - Saturday 8:00 a.m. to 8:00 p.m. (CDT) - Sunday 10:00 a.m. to 8:00 p.m. (CDT)
Canada 1-888-225-4886 USA 1-888-384-9939, Lawn Mower |
| Document File Type | |
| Publisher | toro.com |
| Wikipedia's Page | Toro Company |
| Copyright | Attribution Non-commercial |
(0 votes, average: 0 out of 5)