


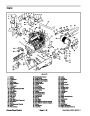


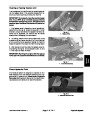


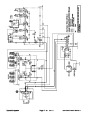
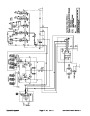
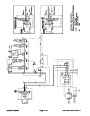
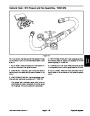


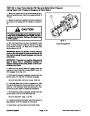
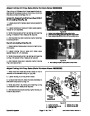


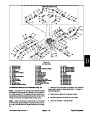


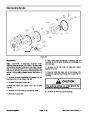


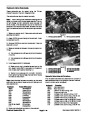
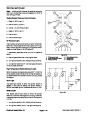


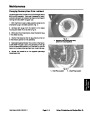


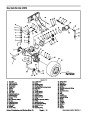

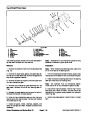
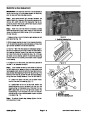

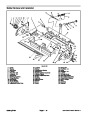


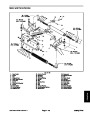


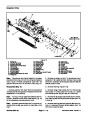
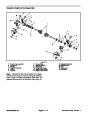


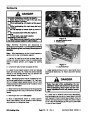
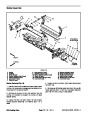


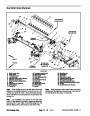


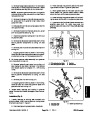


Bedbar Adjuster Service
Antiseize
Lubricant
10
3
Loctite #242
14
(19
to 16 ft--lb
to 21 N--m)
9
8
2
6
5
11
7
5
1
4
RIGHT
FRONT
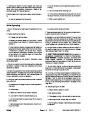
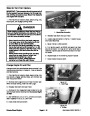
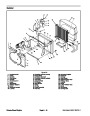
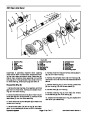
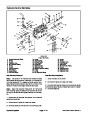
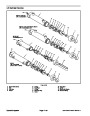
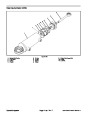
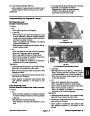
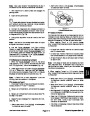
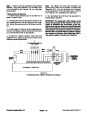
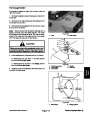
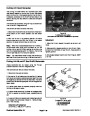
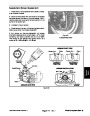
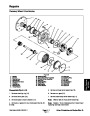
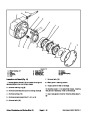
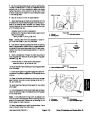
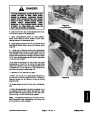
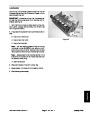
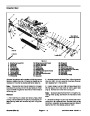
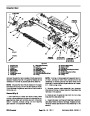
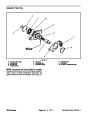
Figure 21
1.
2.
3.
4.
Bedbar assembly
5.
6.
7.
8.
Flange bushing
Cap screw
Detent
9. Retaining ring
10. Bedbar adjuster screw
11. Washer
Compression spring
Lock nut
Bedbar adjuster shaft
Wave washer
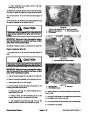
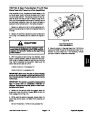
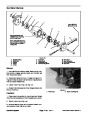
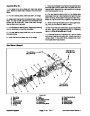
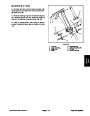
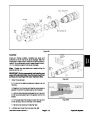
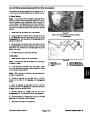
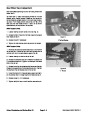
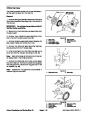
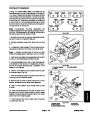
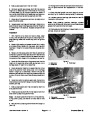
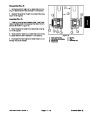
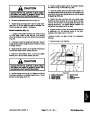
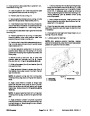
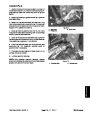
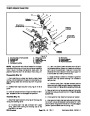
Removal (Fig. 21)
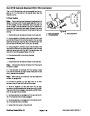
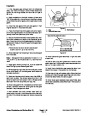
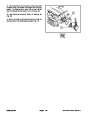
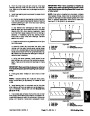
2. Secure detent to the cutting unit side plate with cap
screw. Torque cap screw from 14 to 16 ft--lb (19 to 21
N--m).
1.
2)
Remove lock nut (item 3), compression spring (item
and washer (item 11) from bedbar adjuster screw
(item 10).
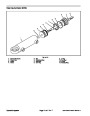
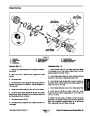
3. If flange bushings (item 5) were removed, align key
on bushing to slot in frame and install bushings.
2.
Remove bedbar (see Bedbar Removal in this sec-
tion).
4. Slide adjuster shaft (item 4) into flange bushings in
cutting unit side plate. Secure adjuster shaft with wave
washer (item 8) and retaining ring (item 9).
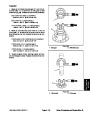
Note:
threads.
Bedbar adjuster shaft (item 4) has left--hand
Note:
threads.
Bedbar adjuster shaft (item 4) has left--hand
3.
bar adjuster screw.
Unscrewbedbaradjustershaft(item4)fromthebed-
5.
er screw that fit into adjuster shaft. Thread bedbar ad-
juster screw (item 10) into adjuster shaft.
Applyantiseize lubricanttothreadsofbedbaradjust-
4.
(item 8) from adjuster shaft and remove adjuster shaft
from cutting unit frame.
Remove retaining ring (item 9) and wave washer
6.
tion).
Install bedbar (see Bedbar Installation in this sec-
5.
plate and remove if necessary.
Inspect flange bushings (item 5) in cutting unit side
7.
Install washer (item 11), spring (item 2) and lock nut
6.
unit side plate by removing the cap screw (item 6).
If detent (item 7) is damaged, remove it from cutting
(item 3) onto adjuster screw. Tighten the lock nut on
each bedbar adjuster assembly until the compression
springisfully compressed, thenloosen lock nut1/2turn.
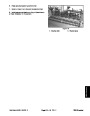
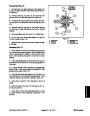
Installation (Fig. 21)
8.
Manual).
Adjust cutting unit (see Cutting Unit Operator’s
1.
If detent (item 7) was removed, apply Loctite #242
(or equivalent) to threads of cap screw (item 6) and se-
cure detent to cutting unit side plate with cap screw.
Torque cap screw from 14 to 16 ft--lb (19 to 21 N--m).
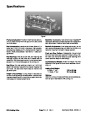
DPA Cutting Units
Page 7.2 -- 20 Rev. E
Reelmaster 6500--D/6700--D
| Categories | Lawn Mower Manual, Toro Lawn Mower Manual |
|---|---|
| Tags | Toro Reelmaster 6500-D, Toro Reelmaster 6700-D |
| Download File |
|
| Document Type | Service Manual |
| Language | English |
| Product Brand | Toro. Customer Service Representatives are available by phone:
Monday - Friday 7:30 a.m. to 9:00 p.m. (CDT) - Saturday 8:00 a.m. to 8:00 p.m. (CDT) - Sunday 10:00 a.m. to 8:00 p.m. (CDT)
Canada 1-888-225-4886 USA 1-888-384-9939, Lawn Mower |
| Product Type | Walk Behind Mower |
| Engine Manufacturer | Toro |
| Document File Type | |
| Publisher | toro.com |
| Wikipedia's Page | Toro Company |
| Copyright | Attribution Non-commercial |
(0 votes, average: 0 out of 5)