
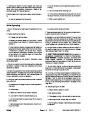


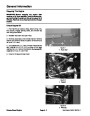
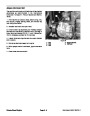


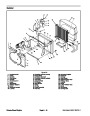
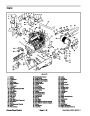


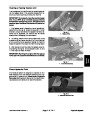


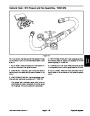


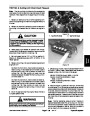
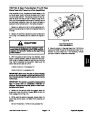
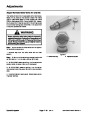


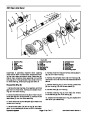
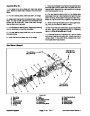
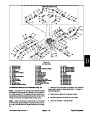
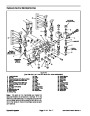


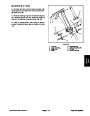
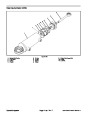

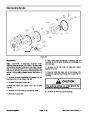


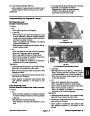
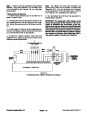

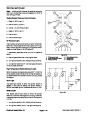
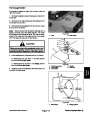


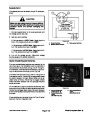


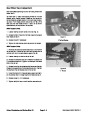
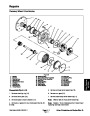

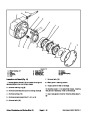
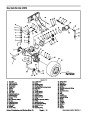

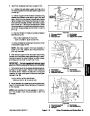
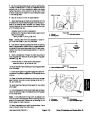
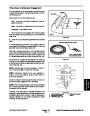
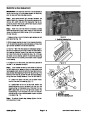
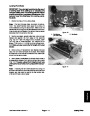

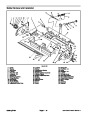


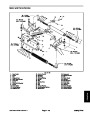

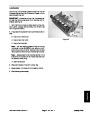

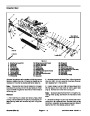
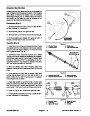
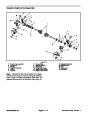


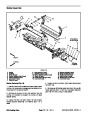


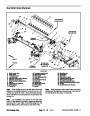


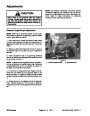


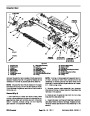
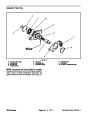
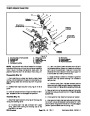


Disassembly (Fig. 28)
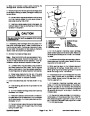
Position the pump into a protected jaw vise, clamping
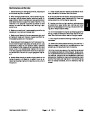
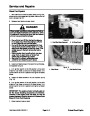
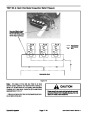
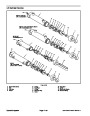
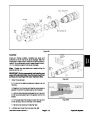
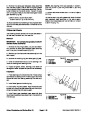
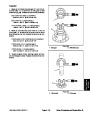
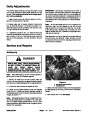
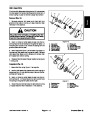
6. Lift backplate straight up off shaft and housing (47).
Remove valve plate (22) from backplate or from rotating
kit assembly (6) still in housing.
1.
onto the outer portion of the flange, with the cap screws
up. Mark the relationship of the working ports (for reas-
sembly identification) tothe servo control assembly with
a scribe. Remove the four screws (19 & 20).
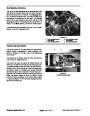
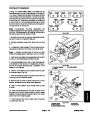
7. From backplate, remove dump valve (42), and relief
valve assemblies (17).
Note:
Mark the relief valve in relationship to the cavity
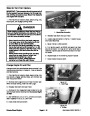
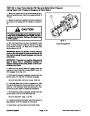
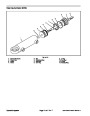
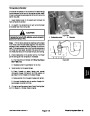
2.
up off backplate (24) and shaft (25). Remove the outer
gerotor (36).
Lift the charge pump adapter assembly (32) straight
it was removed, for reassembly purposes.
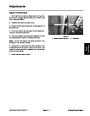
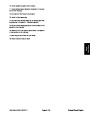
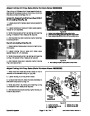
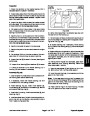
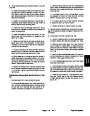
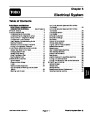
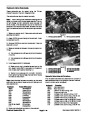
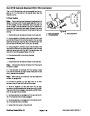
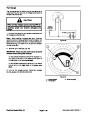
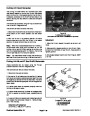
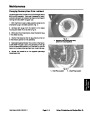
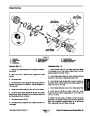
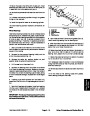
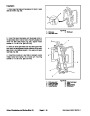
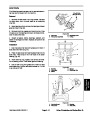
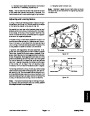
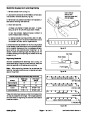
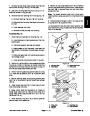
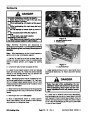
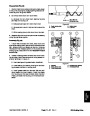
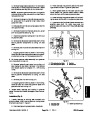
Backplate Inspection:
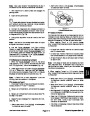
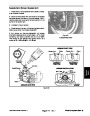
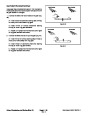
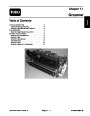
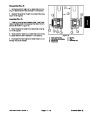
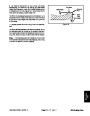
¯ Check the bearing (48) (press fit) in backplate. If
needles remain in cage, move freely, and bearing is
set to the dimension shown, removal not required
(Fig. 30).
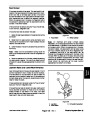
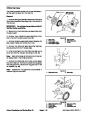
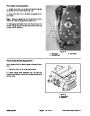
3.
Remove O-ring (26) from charge pump adapter.
4.
&
Remove the inner gerotor and coupler assembly (35
40) from the drive shaft.
5.
valve from the charge pump adapter.
Remove the outer gerotor and charge pump relief
¯ Check roll pin (49) in backplate. If tight and set to the
dimension shown, removal not required (Fig. 30).
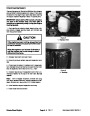
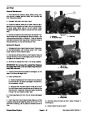
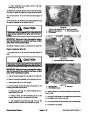
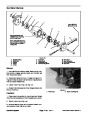
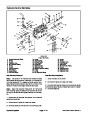
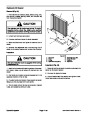
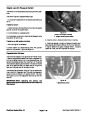
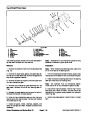
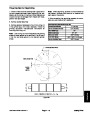
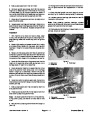
Charge Pump Inspection:
¯
¯
Check the coupler (40) and gerotors (35 & 36) for
wear, cracks, or damage.
Inspect the charge pump relief valve seat inside the
charge pump adapter. The seat should be smooth
and free of burrs and other damage.
¯
¯
Inspect the charge pump relief valve spring (58).
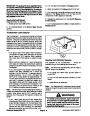
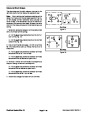
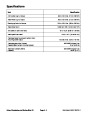
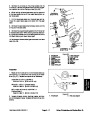
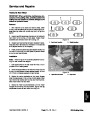
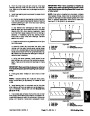
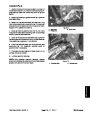
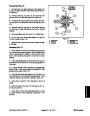
Check the bearing (56) (press fit) in charge pump
adapter. If needles remain in cage, move freely, and
bearingissettothedimensionshown,removalnotre-
quired (Fig. 29).
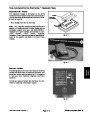
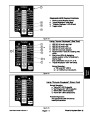
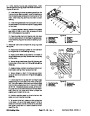
Figure 30
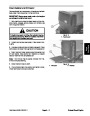
8.
backplate.
Remove housing gasket (11) from housing and/or
¯
Check the gerotor pocket inside the charge pump
adapter.The gerotor pocket should notbe excessive-
ly scored.
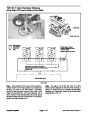
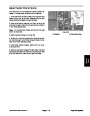
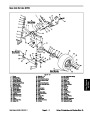
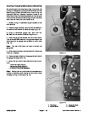
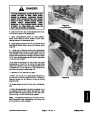
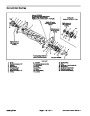
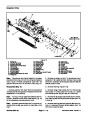
9. Withpumpstillinvise,removethesixcapscrews(21)
retaining the servo control assembly (34). Remove the
control assembly and control housing gasket (50) from
the housing. Remove orifice plates (37 & 38), noting
location for reassembly. Remove nut and lock washer
(27
& 28) and remove control arm (33). Note position of
control arm for reassembly.
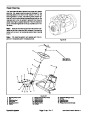
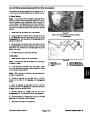
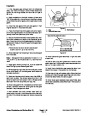
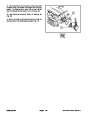
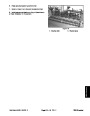
10.
To remove rotating kit assembly (6) from housing,
firstremove pumpfromvisewhileholdingtherotatingkit
assembly in position. Lower pump so that the shaft end
(flange end) isup.Setthe rearofhousing onto tablewith
housing flat and rotating kit assembly at rest on table.
(Hole in table, for protruding shaft, is required.) Lift and
remove the housing and shaft from rotating kit assem-
bly, and camplate.
11.
Remove camplate (14) from rotating kit assembly.
Remove piston follower (8) from camplate.
Figure 29
Reelmaster 6500-D/6700-D
Page 4 - 55
Hydraulic System
| Categories | Lawn Mower Manual, Toro Lawn Mower Manual |
|---|---|
| Tags | Toro Reelmaster 6500-D, Toro Reelmaster 6700-D |
| Download File |
|
| Document Type | Service Manual |
| Language | English |
| Product Brand | Toro. Customer Service Representatives are available by phone:
Monday - Friday 7:30 a.m. to 9:00 p.m. (CDT) - Saturday 8:00 a.m. to 8:00 p.m. (CDT) - Sunday 10:00 a.m. to 8:00 p.m. (CDT)
Canada 1-888-225-4886 USA 1-888-384-9939, Lawn Mower |
| Product Type | Walk Behind Mower |
| Engine Manufacturer | Toro |
| Document File Type | |
| Publisher | toro.com |
| Wikipedia's Page | Toro Company |
| Copyright | Attribution Non-commercial |
(0 votes, average: 0 out of 5)