


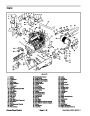


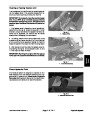


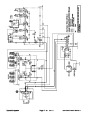
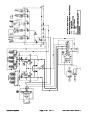


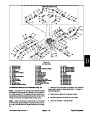


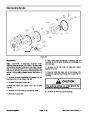


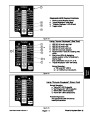


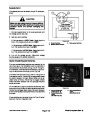


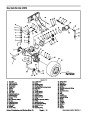

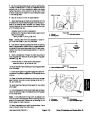
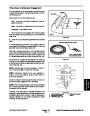

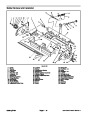


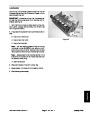

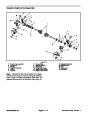


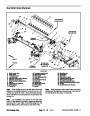


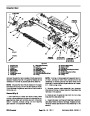


7.
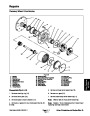
Installnewcover plategasket(10) andcover plate(9)
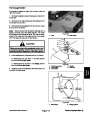
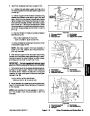
17. Install new Quad-ring (55) on dump valve (42).
Install dump valve and tighten to 27 to 30 ft-lbs. (36 to
40 Nm).
to left side of housing and retain with four washers and
cap screws (5 & 44). Tighten cap screws to 40 to 48 in-
lbs. (4.5 to 5.4 Nm).
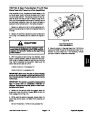
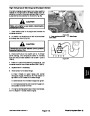
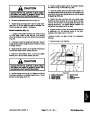
Note:
Make sure paddle of dump valve is perpendicu-
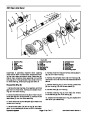
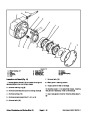
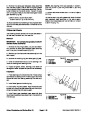
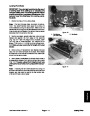
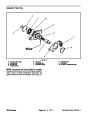
8.
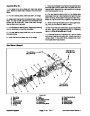
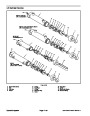
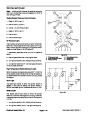
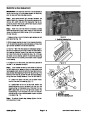
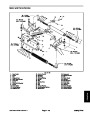
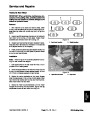
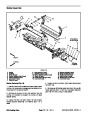
cradle and install cradle bushing (23) onto cradle. Install
screw(52).andtightento14to16in-lbs.(1.6to1.8Nm).
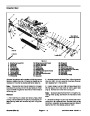
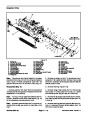
To assemble cradle assembly, press dowels (46) into
lar to relief valve axis prior to installing or damage could
result.
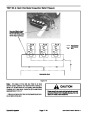
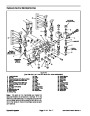
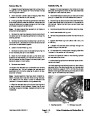
18.
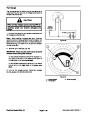
Apply a small amount of petroleum jelly to the steel
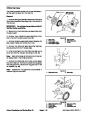
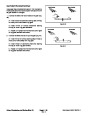
9.
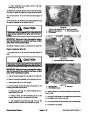
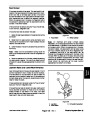
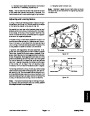
Place cradle assembly into housing making sure
side ofvalve plate (22). Install the valve plate with the in-
dex pin aligned and the steel side of the valve plate
against the backplate (24).
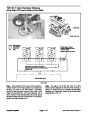
dowels and cradle are completely seated into housing.
Apply Loctite #277 (or equivalent) to the end of threads
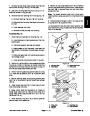
and install two cap screws (18). Tighten cap screws to
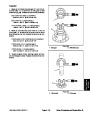
19.
Install backplate assembly onto housing assembly.
25
to 28 ft-lbs. (34 to 38 Nm).
Make sure ports are positioned correctly, and the valve
plate and gasket stay in place.
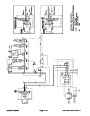
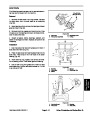
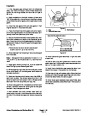
10.
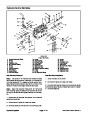
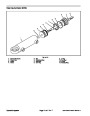
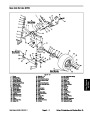
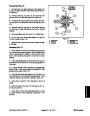
To install shaft (25), place outer retaining ring (3),
thrust race (15), thrust bearing (16). Install inner thrust
race(15),andinnerretainingring(3)ontoshaft.Position
washer (29) and shaft seal (31) onto shaft.
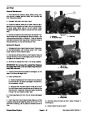
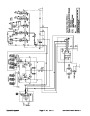
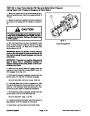
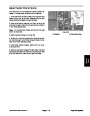
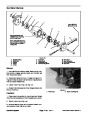
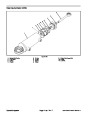
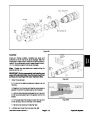
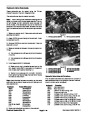
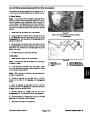
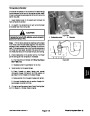
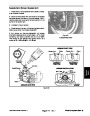
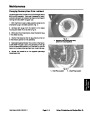
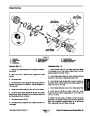
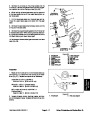
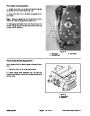
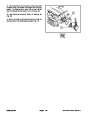
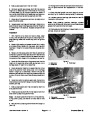
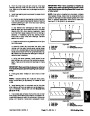
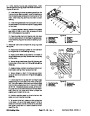
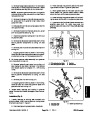
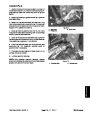
20.
bered end outward into charge pump adapter (Fig. 29).
If necessary, press new bearing (56) with the num-
21.
valve inits original cavity in charge pump adapter.Tight-
en to 27 to 30 ft-lbs. (36 to 40 Nm).
Install new O-ring (60) on plug (61). Install relief
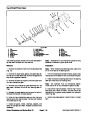
11.
shaft seal into position with seal driver and install retain-
ing ring (2).
Install shaft assembly into front of housing. Seat
22.
onto drive shaft splines. Install outer gerotor (36).
Install inner gerotor and coupler assembly (35 & 40)
12.
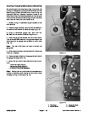
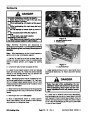
Install servo piston follower (8) onto camplate. Coat
cradle bushing surface with hydraulic oil. Align servo
piston follower (8) with slot in servo piston assembly (7)
and carefully install camplate (14) into cradle bushing
(23).
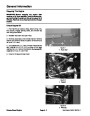
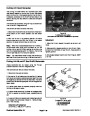
23.
adapter plate(32)overtheinnergerotor and coupler as-
sembly until it contacts the packplate.
Use a new O-ring (26) and place the charge pump
13.
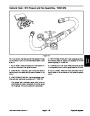
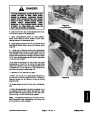
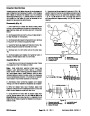
To install rotating kit assembly (6), leave housing
24.
screws (19 & 20) and tighten to 27 to 31 ft-lbs. (37 to
Install charge pump adapter plate with four cap
and shaft in the horizontal position. Holding camplate
into position with screw driver through controller linkage
passageway at the top of housing, place rotating kit as-
sembly over shaft and into housing until pistons rest
against camplate. Make sure all parts are in housing
completely and properly positioned. Return the pump to
the vise with open end of housing up, clamping housing
on the outer portion of the flange.
42
Nm).
25.
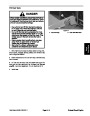
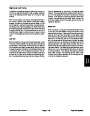
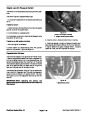
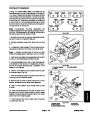
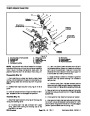
Placecontrolhousinggasket(12)onhousing.Install
orifices (37 & 38) into control assembly (34) and hold in
position with petroleum jelly. Position the feedback link
at90_fromcontrol housing. Install servo control assem-
blyontohousing makingsure feedback link enters small
groove in servo piston assembly (7).
14.
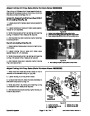
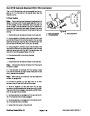
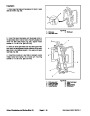
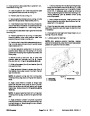
15.
bered end outward, and roll pin (49) with split oriented
away from bearing into backplate (Fig. 30).
Install gasket (11) onto housing.
26.
(21)
Attach servo control assembly with six cap screws
and tighten to 40 to 48 in-lbs. (4.5 to 5.4 Nm).
If necessary, press new bearing (48) with the num-
27.
Install control arm (33) onto servo control assembly.
Retain with lock washer and nut (27 & 28) and tighten to
to 6 ft-lbs. (5 to 8 Nm).
16.
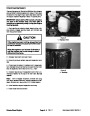
Install new O-rings (54) on relief valves (17). Install
relief valve in its original cavity in backplate. Tighten to
to 110 ft-lbs. (136 to 149 Nm).
4
100
28.
Install new O-rings (56) on all plugs (53) and install
plugsintohousing.Tighten3/4in.plugsto21to24ft-lbs.
(28
(54
to 32 Nm). Tighten 1-1/4 in. plugs to 40 to 45 ft-lbs.
to 61 Nm).
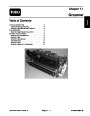
Reelmaster 6500-D/6700-D
Page 4 - 57
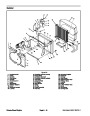
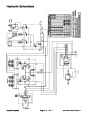
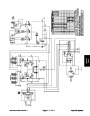
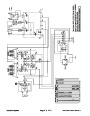
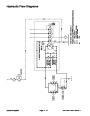
Hydraulic System
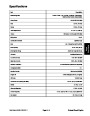
| Categories | Lawn Mower Manual, Toro Lawn Mower Manual |
|---|---|
| Tags | Toro Reelmaster 6500-D, Toro Reelmaster 6700-D |
| Download File |
|
| Document Type | Service Manual |
| Language | English |
| Product Brand | Toro. Customer Service Representatives are available by phone:
Monday - Friday 7:30 a.m. to 9:00 p.m. (CDT) - Saturday 8:00 a.m. to 8:00 p.m. (CDT) - Sunday 10:00 a.m. to 8:00 p.m. (CDT)
Canada 1-888-225-4886 USA 1-888-384-9939, Lawn Mower |
| Product Type | Walk Behind Mower |
| Engine Manufacturer | Toro |
| Document File Type | |
| Publisher | toro.com |
| Wikipedia's Page | Toro Company |
| Copyright | Attribution Non-commercial |
(0 votes, average: 0 out of 5)